Trying to configure 2 separate WANSs and LANs on my routerboard but failing miserably. I am using the RB3011UiAS-RM routerboard.
My use case is a home network and separate home office network, each with it’s own ISP subscription. I do not need communication between LANs.
I wish to separate ether1-5 and ether 6-10 into 2 separate networks with traffic from ether2-5 using WAN1 and ether7-10 using WAN2
ether1 - WAN1
ether2-5 - LAN1 (192.168.0.x)
ether6 - WAN2
ether7-10 - LAN2 (192.168.1.x)
Hope someone can point me in the right direction as I have tried numerous setups but have failed to achieve what I need.
I tried creating 2 bridges, one for ether1-5 and another for ether 6-10 but unable to force computers from LAN1 to use WAN1 exclusively.
Looking for the easiest way to achieve this as my routerboard model has 2 separate hardware switches. Is it possible to achieve what I want without messing with VLANS and such?
You wont need to create vlans if you have enought interfaces.
I think you cannot manage this with bridges including WAN interfaces because LAN and WAN has different settings
I think we will need to use mangle rules
This is my suggestion:
A bridge between ether2 and ether5 with an IP on this bridge
Another bridge between ether7 and ether10 with an IP on this another bridge (In another net segment)
Maybe a DHCP server on each bridge if you want
Configure both WANs with they IP addresses and make sure to add a default rute if these IP addresses are static
With this, instead of doing PCC, you will use a different WAN for a different bridge
If you never created mangle rules, take care, do not leave details
Regards,
Damián
Maybe I am missing something here but,
----> After setting this up, can the WAN part be achieved by adding two basic NAT rules.
Something like:
Bridge-LAN1 (or src subnet 1)-> output interface Ether1 (WAN1)
Bridge-LAN2 (or src subnet 2) → output interface Ether6 (WAN2)
Hello Broderick!
I dont think so, I think you will change the source IP but this does not force the route to going out, just changing the IP where it can go back. Just my thinking, I did not test this.
After setting this up, can the WAN part be achieved by adding two basic NAT rules.
Even one general NAT rule for the WAN interface list will do (it’s in the default config already) . The IP address used will be that of the WAN interface anyway
The default route for the 2 LAN’s (with their own network IP range) will be different. One bridge with DHCP server per LAN.
(Which WAN to use could be based on LAN src IP address, or just could be delivered as default gateway by the DHCP server of that LAN)
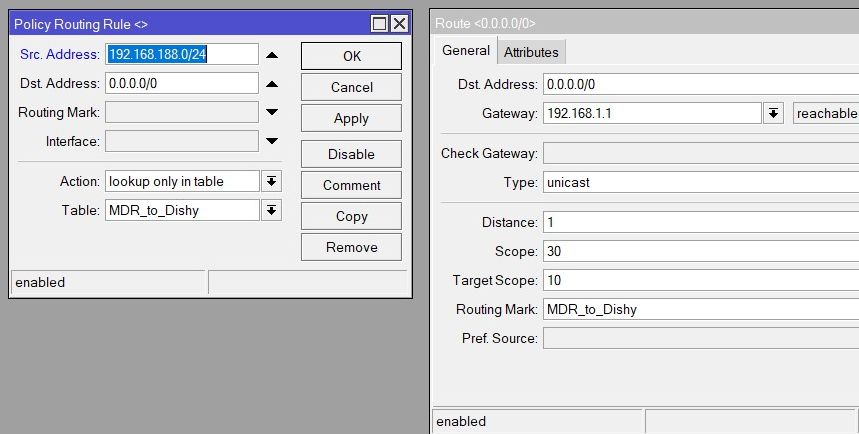
Routing setup in ROS V6 could be something like this screenshot for each LAN. ROS V7 has some other ways of indicating the WAN interface, besides IP address of the gateway.
yes, I think you’re right.
It occurred to me that I too had set these settings to force traffic from two different LANs going out through two different WANs
Hi Damián, thank you for your reply.
I did try to use a similar method like you posted but got stuck on the last part. I assume your PCC config is mangle rules?
* Configure both WANs with they IP addresses and make sure to add a default rute if these IP addresses are static
What do you mean by this part? my WAN IP addresses are randomly assigned by the ISP (PPPOE connection)
Do I still need to use the PCC configuration in Damiáns guide if I use the method in your screenshot?
Hi Sindy, for the VRF method you linked, what is the command/setting to achieve this in my use case?
Because I have multiple lan ports in a bridge (Ether2-5) to use wan (Ether1)
In this case, the IP stack doesn’t know anything about ether2 to ether5, it only knows about the bridge one. So you need to place just ether1 and bridge to the same VRF.
Unless you have a configured and tested serial access to your router, before changing configuration, always save a backup to the non-volatile part of router’s memory (some routers need the file names to begin with flash/ to survive reboot). If you lock yourself out, you can reset the configuration to factory default using the reset button and then restore the previous configuration. Safe mode is also good but I had cases when it failed.