SOLVED
The next day I posted this I looked again on all tutorials.
Ok, I am newbie on Mikrotik and this was the first time when
I bought a router like this. At the beginning, Mikrotik’s
CLI looked so very different than Cisco or Debian based routers.
Therefore I started with GUI, using a little bit CLI too.
The solution is for newbies as me, so don’t throw with rocks.
This scenario involves:
- one GPON ONT device (FTTH, e.g. Huawei, set in “Bridge Mode”);
- one Mikrotik Router RB3011UiAS-RM (behind GPON ONT device) connecting through PPPoE connection;
- one PC with a connection (e.g. laptop with USB 3G modem - L2TP VPN client);
- one PC behind Mikrotik router.
What I need: a reliable VPN connection between those two PCs from above.
The Mikrotik’s configuration:
- bridge: ether2-10 (lan ports);
- wan port (without IP config): ether1;
- sfp1 port: disabled (unfortunately, my ISP doesn’t allow
me to connect the fiber directly to my Mikrotik router);
- Mikrotik’s LAN: 192.168.0.0/24;
- Mikrotik’s private address: 192.168.0.1;
- the pc behind Mikrotik’s IP: 192.168.0.10 (or define/use
dhcp pool in the router’s GUI, on WebFig, Menu: IP, Pool);
- PPPoE connection: in the router’s GUI, on WebFig,
Menu: PPP >> Add New >> PPPoE Client:
Name [pppoe-out1]
Interfaces [ether1]
User [xxxxxxx] # put here your pppoe username
Password [xxx] # put here your pppoe password
Profile [default]
Keepalive Timeout [10]
Dial On Demand
Use Peer DNS
Add Default Route
Default Route Distance [1]
Allow pap chap mschap1 mschap2
check Enabled
clicking on “Apply”, if the credentials are correct,
it will appear “Actual MTU (xxxx)” (1480 for me).
Click “OK” and that’s it.
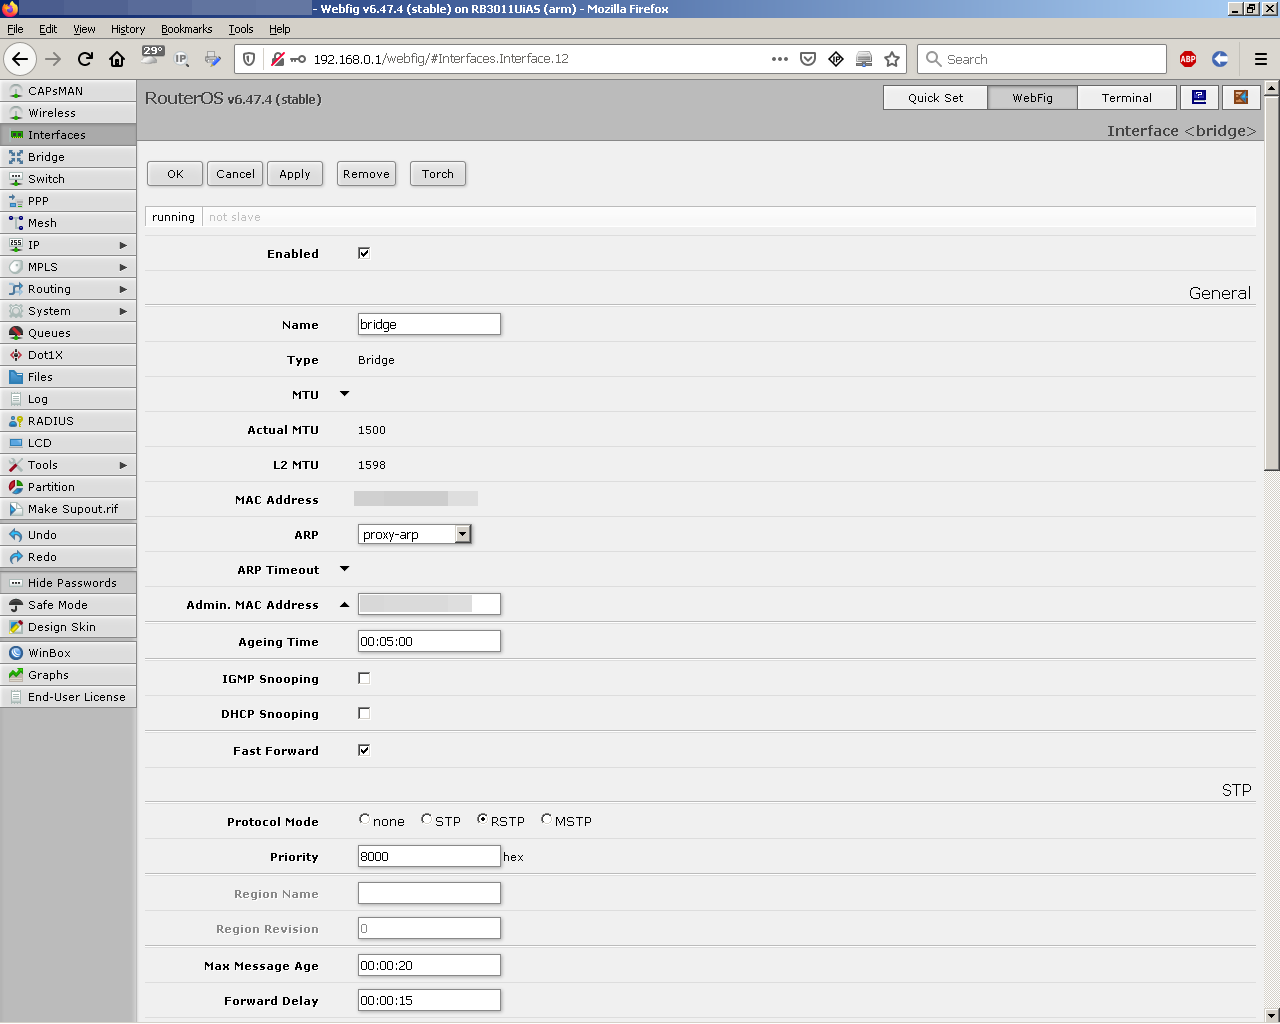
- Allow your PCs to see each other: in the router’s GUI, on WebFig,
Menu: Bridge, click on existing Bridge and modify
ARP’s option from [enabled] to [proxy-arp];
click “Apply” then “OK”.
If you’ll set up by mistake [disabled] (clicking also “Apply”),
either be prepared to reset the router to factory settings, or
plug a Cisco console cable into the console (back side) port
and manual reconfigure the router.
- L2TP VPN Server configuration: in the router’s GUI, on WebFig,
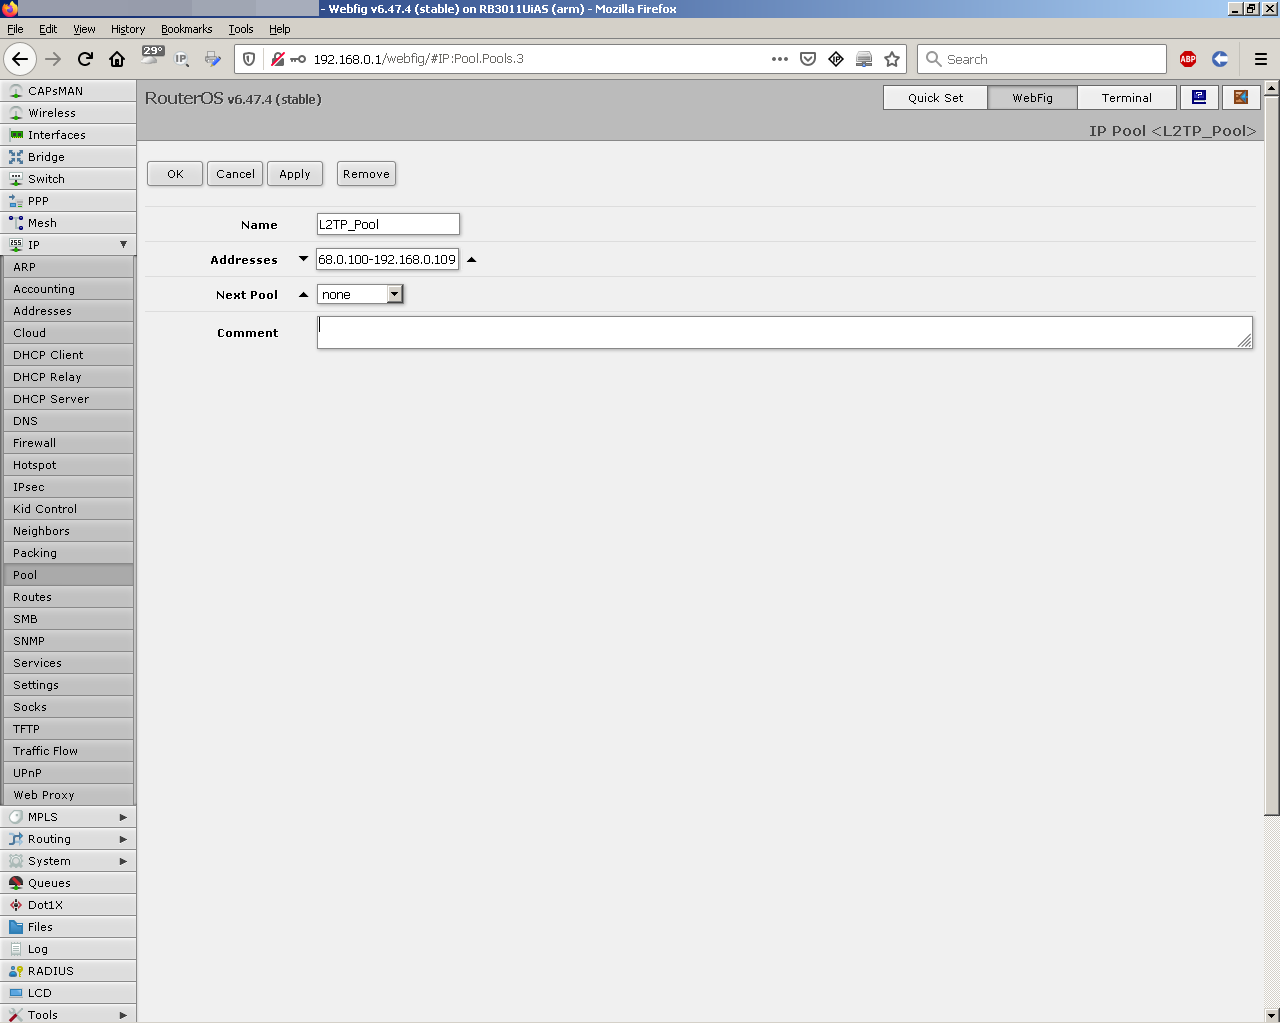
- Menu: IP >> Pool >> Add New:
Name [L2TP_Pool]
Addresses [192.168.0.100-192.168.0.109]
Next Pool (none)
click “Apply” then “OK”.
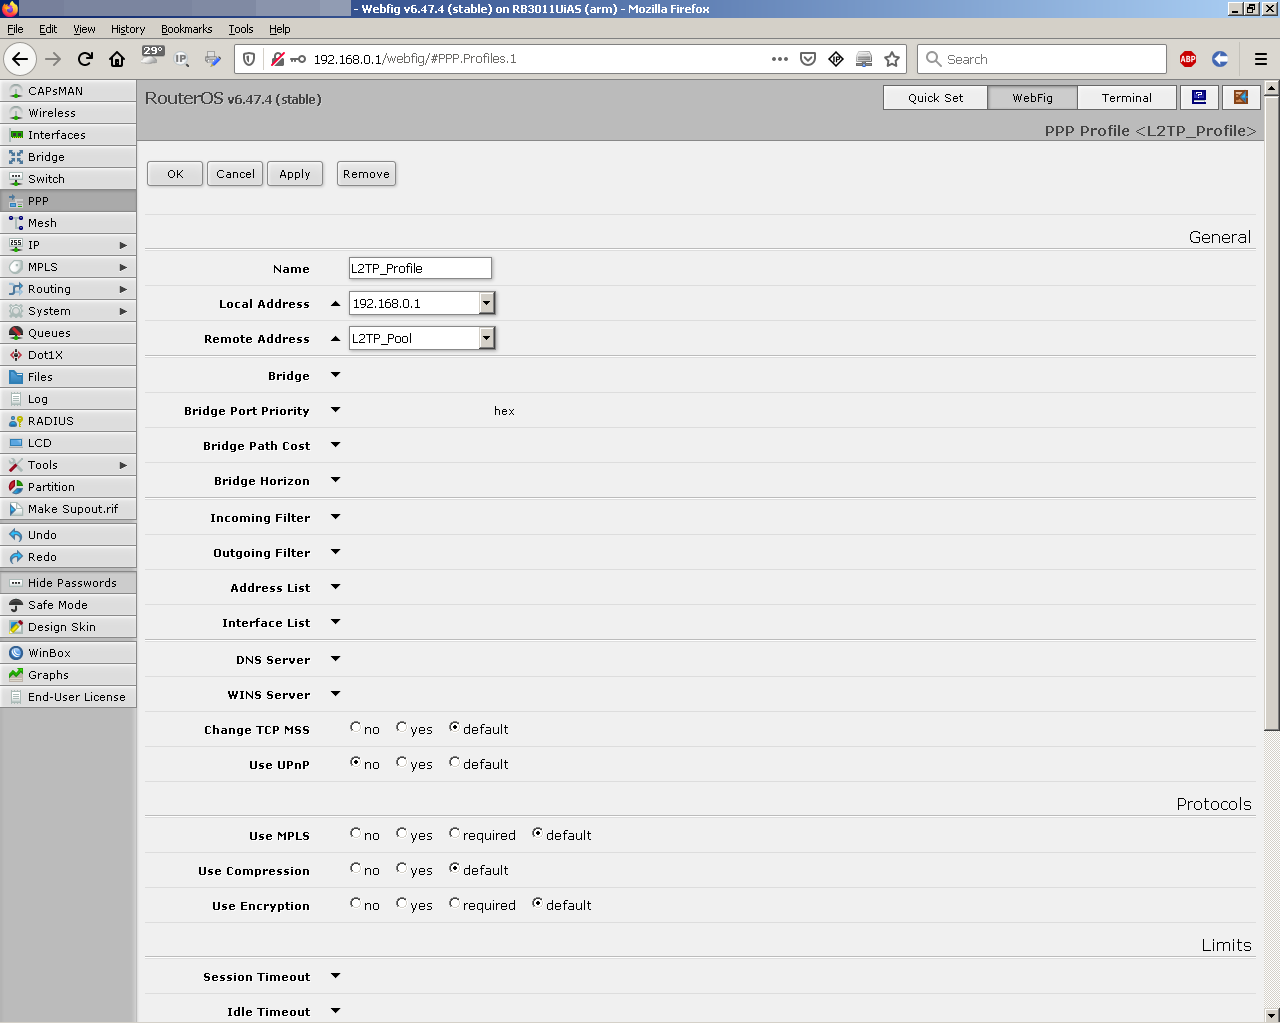
- Menu: PPP >> Profiles >> Add New:
Name [L2TP_Profile]
Local address [192.168.0.1]
Remote Address [L2TP_Pool]
click “Apply” then “OK”.
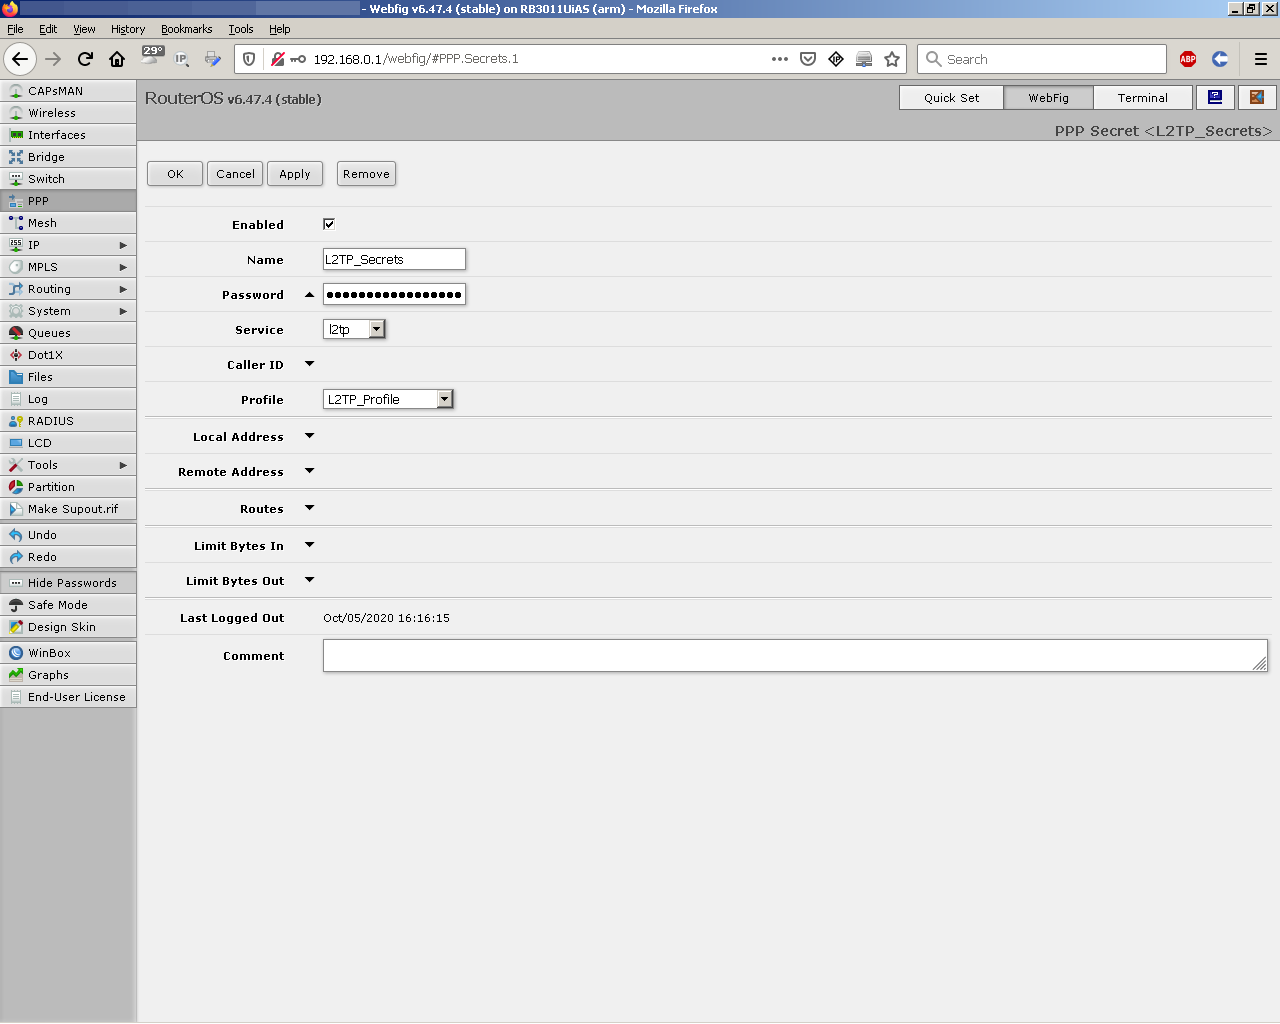
- Menu: PPP >> Secrets >> Add New:
Name [L2TP_Secrets] # put here your vpn username
Password [xxxxxxxx] # put here your vpn password
Service [l2tp]
Profile [L2TP_Profile]
check Enabled
click “Apply” then “OK”.
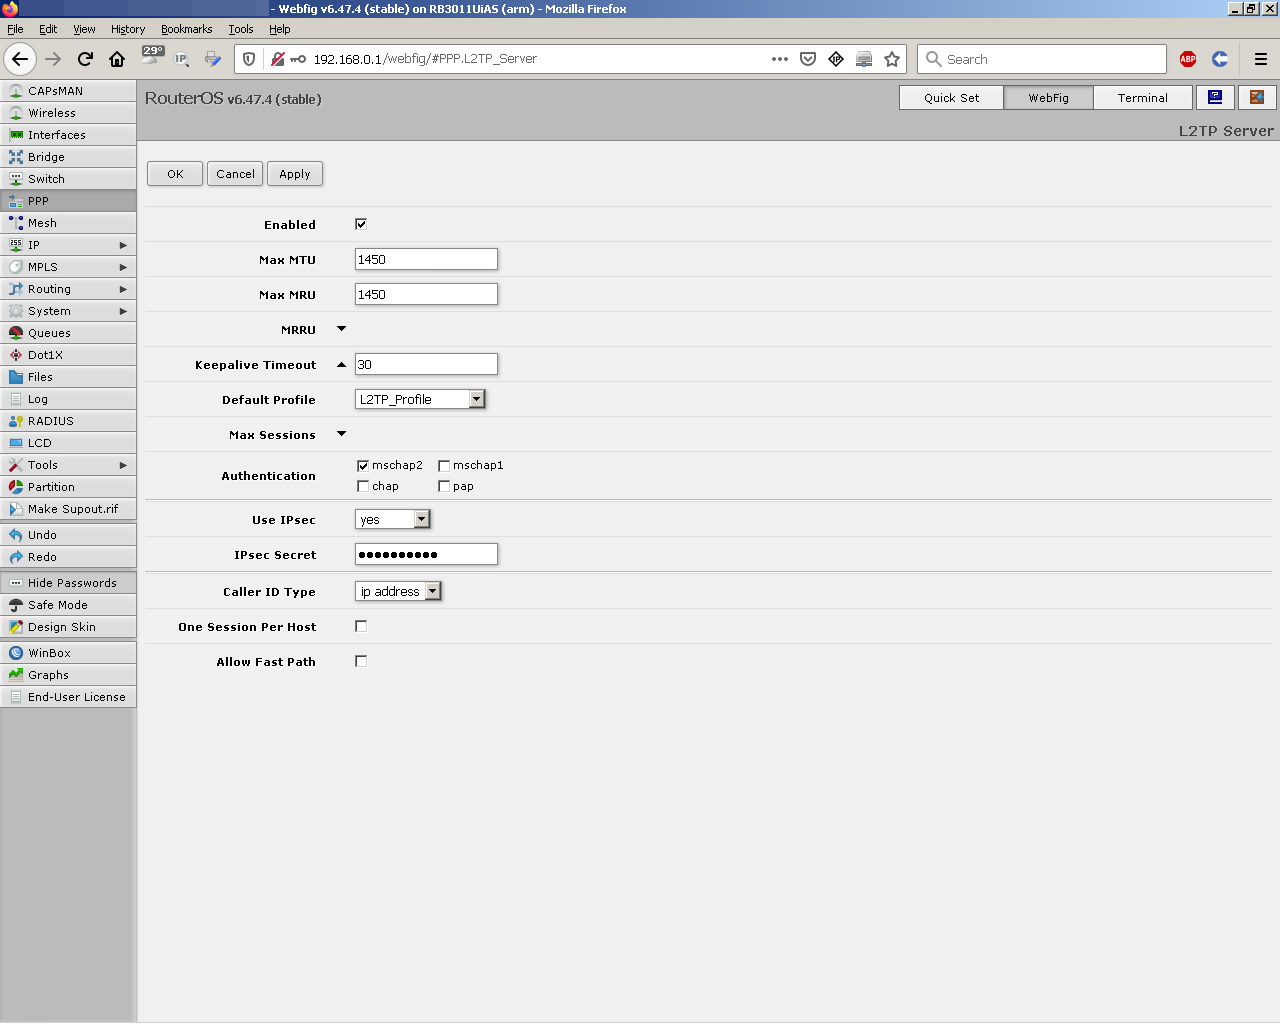
- Menu: PPP >> Interface >> L2TP Server:
Max MTU [1450]
Max MRU [1450]
Keepalive Timeout [30]
Default Profile [L2TP_Profile]
Authentication mschap2
Use IPsec [yes]
IPsec Secret [xxxxxx] # put here your ipsec secret
Caller ID Type [ip address]
click “Apply” then “OK”.
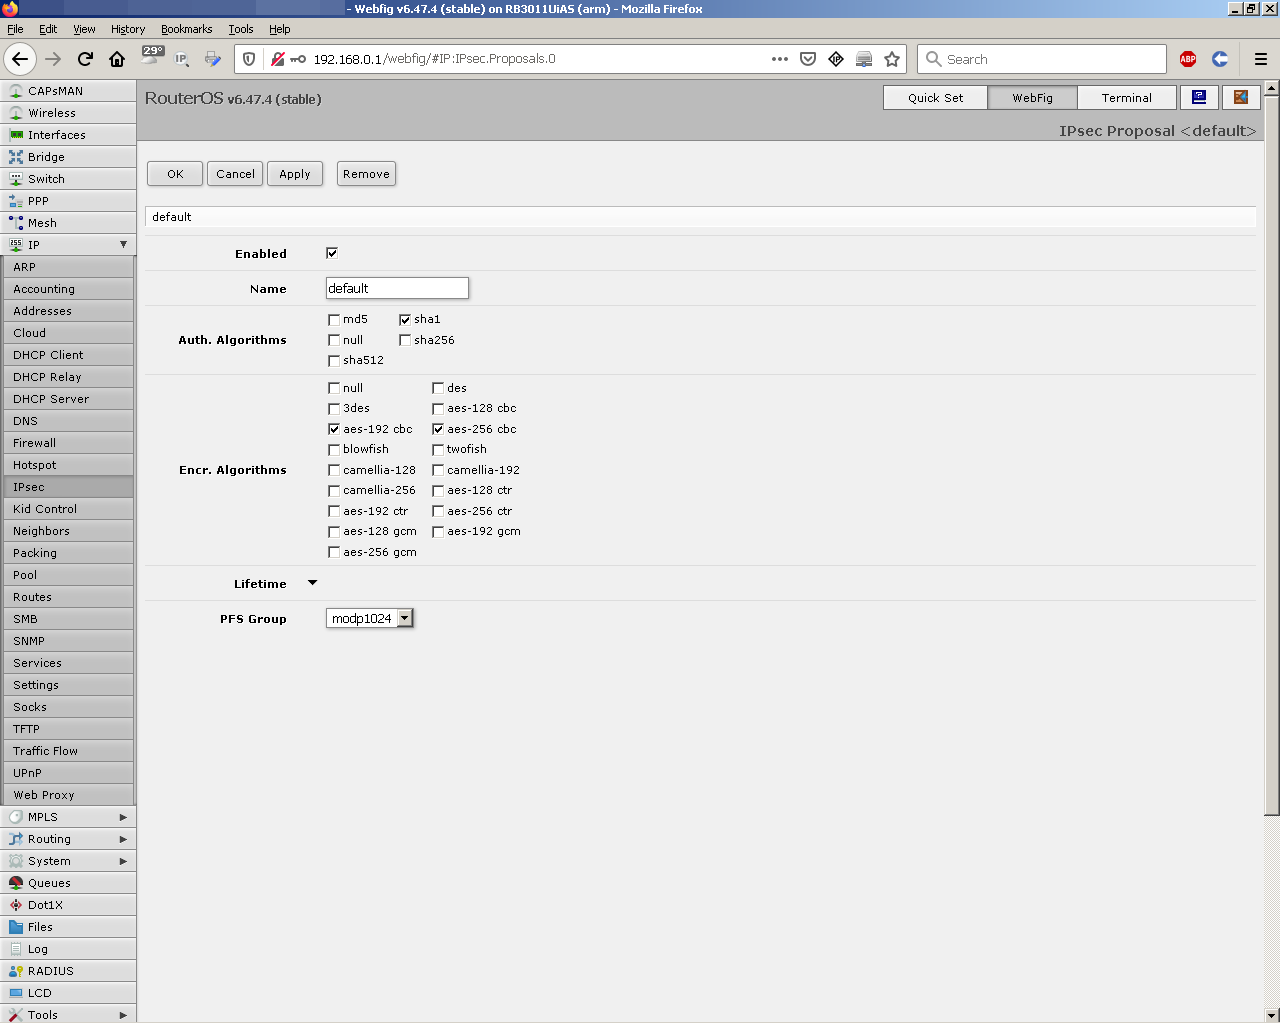
- Menu: IP, IPsec >> Proposals >> click onto “default”:
Name [default]
Auth. Algorithms sha1 (you may try others)
Encr. Algorithms aes-192 cbc aes-256 cbc (you may try others)
PFS Group [modp1024]
check Enabled
click “Apply” then “OK”.
-
Menu: IP, Firewall >> NAT >> click onto rule #0
(if this doesn’t exist, create it with Add New):
Chain [srcnat]
Out. Interface [pppoe-out1]
…
Action [masquerade]
check Enabled
click “Apply” then “OK”.
-
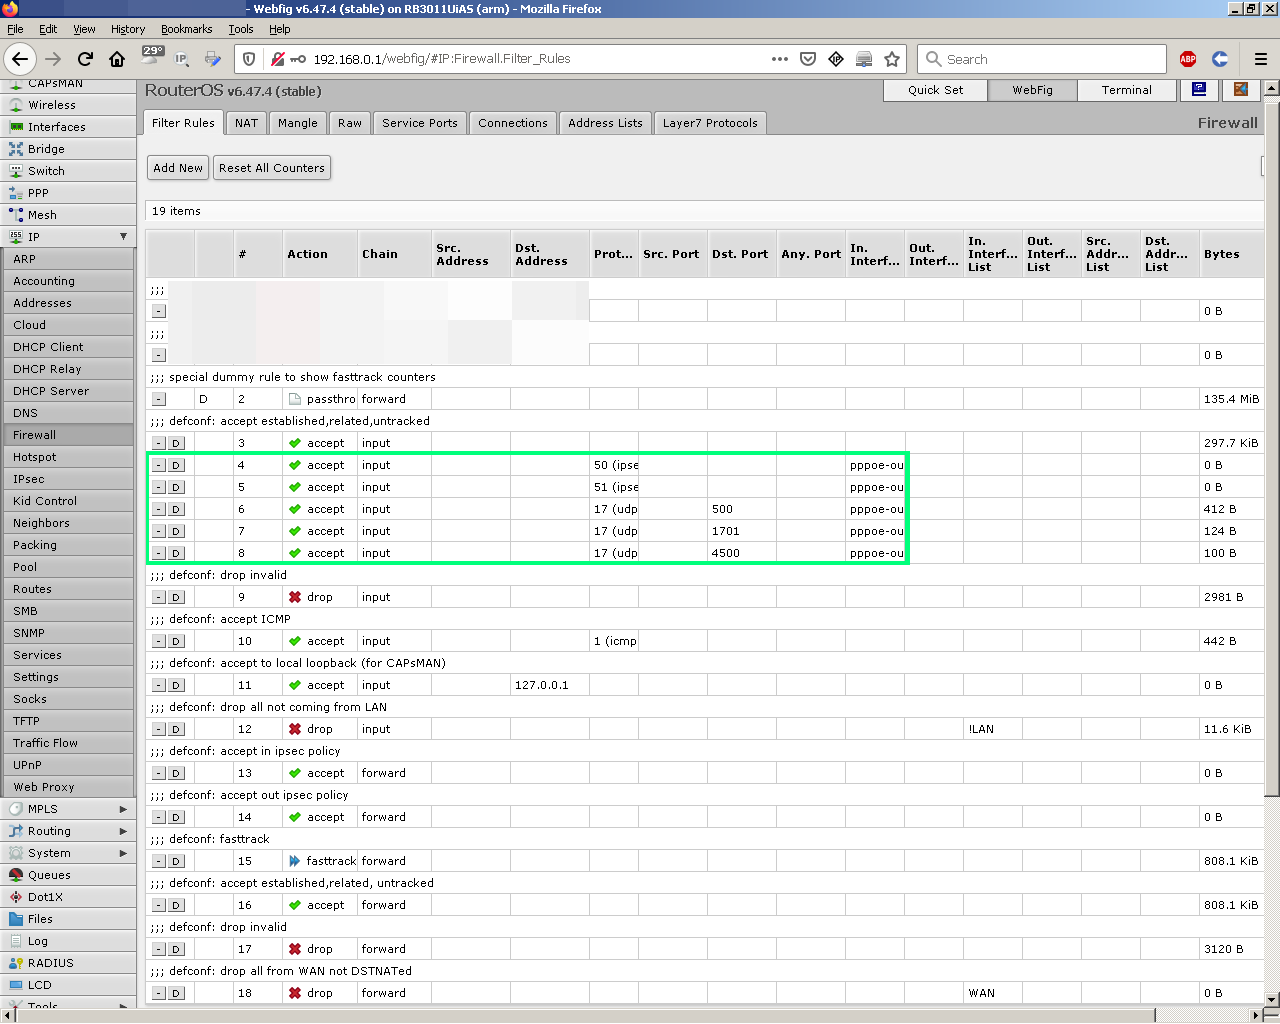
Menu: IP, Firewall >> Filter Rules >> Add New (five rules):
(1/5)
Chain [input]
Protocol [50 (ipsec-esp)]
In. Interface [pppoe-out1]
Action [accept]
check Enabled
click “Apply” then “OK”.
(2/5)
Chain [input]
Protocol [51 (ipsec-ah)]
In. Interface [pppoe-out1]
Action [accept]
check Enabled
click “Apply” then “OK”.
(3/5)
Chain [input]
Protocol [17 (udp)]
Dst. Port [500]
In. Interface [pppoe-out1]
Action [accept]
check Enabled
click “Apply” then “OK”.
(4/5)
Chain [input]
Protocol [17 (udp)]
Dst. Port [1701]
In. Interface [pppoe-out1]
Action [accept]
check Enabled
click “Apply” then “OK”.
(5/5)
Chain [input]
Protocol [17 (udp)]
Dst. Port [4500]
In. Interface [pppoe-out1]
Action [accept]
check Enabled
click “Apply” then “OK”.
Arrange (drag&drop) these five rules above the rule with action drop on the chain input.
- L2TP VPN Client configuration (pc with old OS, e.g Win7):
Add new connection (VPN):
User name: L2TP_Secrets # put here your vpn username (as you defined it on router)
Password: [xxxxxxxx] # put here your vpn password (as you defined it on router)
Properties:
- General: Host name or IP [your Mikrotik’s router public IP or ddns hostname];
- Security: Type of VPN: Layer 2 Tunneling Protocol with IPsec (L2TP/IPSec),
Advanced settings: use preshared key for authentication, key: [xxxxxx]
put here your ipsec secret (as you defined it on router);
Data encryption: Maximum strength encryption (disconnect if server declines)
Check (radio button) Allow these protocols: PAP, CHAP, MS-CHAP v2;
- Networking: TCP/IPv4, File and Printer Sharing for MS Networks, Client for MS Networks;
Click “OK”, then “Connect”.