Hello everyone, I have a dual wan failover configuration working correctly in the “UNTAGGED” network (called “LAN” in my config) but in the TAGGED VLANs (10,20,30,40) when switching from ISP1 to ISP2 (WAN1 to WAN2) only the UNTAGGED network has a connection to WAN2 and the tagged VLANs remains disconnected from WAN, I don’t know why this happens. I don’t know if I have to configure something in the firewall so that all vlans go out through WAN2 in case of WAN1 failure, I attached screens of IP Address, Routes and Firewall configuration. I appreciate suggestions in advance.


If all the LAN subnets can access internet via WAN1, tagging has nothing to do with the issue, it’s most likely a misconfiguration of the firewall. Instead of screenshots, post an export of the configuration: on the command line (open a terminal window in Winbox or Webfig or connect to the router using ssh), run /export file=somenicename, download the file, use your favourite text editor to obfuscate public IP addresses, user names for external services, serial numbers, MAC addreses - whatever you don’t want to publish, and post the result here between [code] and [/code] tags.
Thanks for your reply! Here the post of the configuration file:
# software id = TW8W-U59F
#
# model = RB1100x4
# serial number = HG409TG7X3Z
/interface ethernet
set [ find default-name=ether6 ] name=LAN
set [ find default-name=ether1 ] comment=Principal name=WAN1
set [ find default-name=ether2 ] comment=Failover name=WAN2
/interface vlan
add interface=LAN name=20 vlan-id=20
add interface=LAN name=30 vlan-id=30
add interface=LAN name=10 vlan-id=10
add interface=ether5 name=VPN vlan-id=50
add interface=LAN name=WiFi40 vlan-id=40
/interface ethernet switch port
set 0 default-vlan-id=0
set 1 default-vlan-id=0
set 2 default-vlan-id=0
set 3 default-vlan-id=0
set 4 default-vlan-id=0
set 5 default-vlan-id=0
set 6 default-vlan-id=0
set 7 default-vlan-id=0
set 8 default-vlan-id=0
set 9 default-vlan-id=0
set 10 default-vlan-id=0
set 11 default-vlan-id=0
set 12 default-vlan-id=0
set 13 default-vlan-id=0
set 14 default-vlan-id=0
set 15 default-vlan-id=0
/interface wireless security-profiles
set [ find default=yes ] supplicant-identity=MikroTik
/ip pool
add name=dhcp_pool0 ranges=192.168.120.1-192.168.120.253
add name=dhcp_pool1 ranges=192.168.120.1-192.168.120.253
add name=dhcp_pool2 ranges=192.168.120.1-192.168.120.253
add name=dhcp_pool3 ranges=192.168.150.2-192.168.150.254
add name=dhcp_pool4 ranges=192.168.1.2-192.168.1.254
add name=dhcp_pool5 ranges=192.168.120.1-192.168.120.253
add name=dhcp_pool6 ranges=192.168.130.2-192.168.130.254
add name=dhcp_pool7 ranges=192.168.140.2-192.168.140.254
add name=dhcp_pool8 ranges=192.168.150.2-192.168.150.254
add name=dhcp_pool9 ranges=192.168.160.2-192.168.160.254
add name=dhcp_pool10 ranges=192.168.85.2-192.168.85.254
/ip dhcp-server
add address-pool=dhcp_pool5 disabled=no interface=LAN lease-time=8h name=\
dhcp1
add address-pool=dhcp_pool6 disabled=no interface=10 lease-time=8h \
name=dhcp2
add address-pool=dhcp_pool7 disabled=no interface=20 lease-time=8h \
name=dhcp3
add address-pool=dhcp_pool8 disabled=no interface=30 lease-time=8h \
name=dhcp4
add address-pool=dhcp_pool9 disabled=no interface=40 lease-time=8h \
name=dhcp5
/system logging action
set 0 memory-lines=1
/interface ovpn-server server
set auth=sha1 certificate=SERVER cipher=aes256 enabled=yes port=1195 \
require-client-certificate=yes
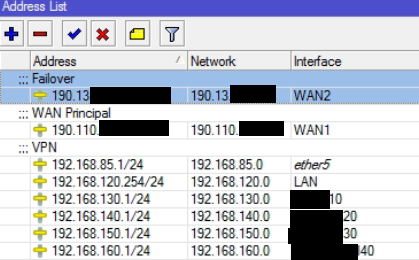
/ip address
add address=192.168.130.1/24 interface=10 network=192.168.130.0
add address=192.168.150.1/24 interface=30 network=192.168.150.0
add address=192.168.120.254/24 interface=LAN network=192.168.120.0
add address=192.168.85.1/24 comment=VPN interface=ether5 network=192.168.85.0
add address=192.168.140.1/24 interface=20 network=192.168.140.0
add address=192.168.160.1/24 interface=40 network=192.168.160.0
add address=190.110.xxx.xxx/24 comment="WAN Principal" interface=WAN1 network=\
190.110.xxx.0
add address=190.13.xxx.xxx/24 comment=Failover interface=WAN2 network=\
190.13.xxx.0
/ip dhcp-server network
add address=192.168.85.0/24 dns-server=8.8.8.8,8.8.4.4 gateway=192.168.85.1 \
netmask=24
add address=192.168.120.0/24 dns-server=8.8.8.8,8.8.4.4 gateway=\
192.168.120.254
add address=192.168.130.0/24 dns-server=8.8.8.8,8.8.4.4 gateway=192.168.130.1
add address=192.168.140.0/24 dns-server=8.8.8.8,8.8.4.4 gateway=192.168.140.1
add address=192.168.150.0/24 dns-server=8.8.8.8,8.8.4.4 gateway=192.168.150.1
add address=192.168.160.0/24 dns-server=208.67.222.222,208.67.220.220 \
gateway=192.168.160.1
/ip dns
set allow-remote-requests=yes servers=8.8.8.8,8.8.4.4
/ip firewall filter
add action=accept chain=input comment="Aceptar conexin VPN" dst-port=1195 \
protocol=tcp
/ip firewall nat
add action=masquerade chain=srcnat ipsec-policy=out,none out-interface=WAN1
add action=masquerade chain=srcnat out-interface=WAN2
add action=masquerade chain=srcnat comment="Trfico VPN a LAN" ipsec-policy=\
out,none src-address=192.168.120.0/24
/ip route
add check-gateway=ping distance=1 gateway=8.8.8.8
add check-gateway=ping distance=2 gateway=8.8.4.4
add distance=1 dst-address=8.8.4.4/32 gateway=190.13.xxx.xxx scope=10
add distance=1 dst-address=8.8.8.8/32 gateway=190.110.xxx.xxx scope=10
/ip service
set telnet disabled=yes
set ftp disabled=yes
set www disabled=yes
set ssh disabled=yes
set api disabled=yes
set api-ssl disabled=yes
Is that a complete export of your configuration or have you removed some lines in whole, rather than obfuscating only the sensitive items on them, because you assumed they were not relevant?
The reason why I am asking is that if this is the complete export, your firewall does not exist, as the default action in all chains is accept and there is no action=drop rule in your /ip firewall filter table. So packets that do not get accepted by the single rule named “Aceptar conexin VPN” got accepted by default, and anyone in the world can manage your router using Winbox if he managed to harvest the credentials in the past or knows some vulnerability of the Winbox interface.
Regarding your issue with failover, so far the explanation that seems the most likely to me is that you make wrong conclusions from correct data, as there is nothing in the configuration that would suggest any difference between handling the traffic from 192.168.120.0/24 and from the other local subnets.
However, as long as WAN1 remains physically up, the address 190.110.x.x on the router remains up too, so all connections from any LAN subnet that initially established via WAN1 and got src-nated to this address keep using that address also when routed via WAN2, that’s how NAT and connection tracking works. There are two points that make the difference between action=masquerade and action=src-nat: with masquerade, you do not have to specify the new source address (the reply-dst-address in the connection tracking vernacular) because the one attached to the out-interface is used automatically, and the tracked connections whose reply-dst-address is lost (because it was assigned using DHCP or another dynamic protocol or because the interface it is attached to went down) are automatically removed from the list of tracked connections, so if packets belonging to such a connection keep coming, the first of them creates a new tracked connection, totally unrelated to the previous one. But in your case, none of this happens unless you disconnect or disable WAN1, i.e. if the traffic starts being routed via WAN2 because the check-gateway ping stopped getting responses from 8.8.8.8.
The above is not an issue for TCP connections as these time out eventually, so the client either retries automatically or you have to ask it to create a new connection manually, but in either case, the new actual connection uses a different port at the client side than the previous one so the connection tracking in the firewall treats it as a new one. But UDP connections keep reusing the same port and the interval between retries is much shorter than the lifetime of a UDP tracked connection, so the tracked connection with a wrong reply-dst-address keeps being updated, and the packets keep being sent via WAN2 with IP address of WAN1 as source. It doesn’t matter much whether the ISP drops them because they have a wrong source address (quite a lot of ISPs don’t) or whether the remote party sends the response to address of WAN1 which is unreachable - in either case the local party never receives the response.
So in the next round of testing, try with pings first, and stop the ping for more than 10 seconds after imitating the outage of WAN1 (10 seconds is the default lifetime of an ICMP tracked connection) before trying again.
If that works for pings from any local subnet, you’ll know that the routing is indeed OK and you can start thinking about some housekeeping script that will periodically remove tracked connections whose reply-dst-address does not match the actual state of the routing.
- remove router serial number from initial post of config
- need firewall rules
- probably should upgrade to 7.16.2 latest firmware
- probably should use vlans (Using RouterOS to VLAN your network - #303 by anav)
- use normal pool setups
Summary your vlan and pools and setup is a colossal mess. Simplify and clean up.
FIX your recursive routing............ Do not use same dns address for recursive as using for IP DNS!!!
_/ip route
add check-gateway=ping distance=1 dst-address=0.0.0.0/0 gateway=1.1.1.1 scope=30 target-scope=12 comment=ISP1
add check-gateway=ping distance=2 dst-address=0.0.0.0/0 gateway=9.9.9.9 scope=30 target-scope=12 comment=ISP2
add distance=1 dst-address=1.1.1.1/32 gateway=190.13.xxx.xxx scope=12 target-scope=11
add distance=2 dst-address=9.9.9.9/32 gateway=190.110.xxx.xxx scope=12 target-scope=11
Note: Assuming your VPN is coming in on the primary WAn?