Running Private ZeroTier Root Servers in RouterOS Containers
This guide describes how to run upstream ZeroTier One in a RouterOS container with private root servers, a separate Controller, and an optional gateway, using CHR on Hyper-V as the example platform; but any RouterOS device with Container support and sufficient memory will work.
This guide assumes the private Planet file has already been generated.
1. Prerequisites
| Requirement | Details |
|---|---|
| Hyper-V access | Administrative access to create the VM, attach disks and adapters, and power the VM off and on |
| RouterOS CHR | A CHR VHDX image and the matching container package |
| Storage | A separate virtual disk for container images and persistent data |
| Container image | A pinned zerotier/zerotier tag available for linux/amd64 |
| Root instances | Two instances with unique identities and stable physical IP/UDP endpoints on different physical hosts |
| Private Planet | A signed binary planet containing both roots' public identities and stableEndpoints |
| Controller | A separate ZeroTier One instance with local Controller API access |
| Clients | ZeroTier One installers for Windows and Linux |
| Addressing | Non-overlapping container, LAN and ZeroTier subnets |
| Network access | Routes, firewall rules and UDP port forwarding needed to reach the roots |
| Administrative access | RouterOS administration, elevated PowerShell on Windows and sudo on Linux |
| Optional gateway | A separate container with persistent state, /dev/net/tun, TAP privileges and IP forwarding |
1.1 Version matrix
Record the validated versions before deployment:
| Component | Version |
|---|---|
| RouterOS CHR | <ROUTEROS-VERSION> |
| CHR license | <free / p1 / p10 / unlimited> |
| ZeroTier image | zerotier/zerotier:<IMAGE-TAG> |
| Windows client | <VERSION> |
| Linux client | <VERSION> |
| Controller | <VERSION> |
The container examples use the mountlists syntax. Older RouterOS releases use a different mount syntax. Confirm the syntax on your release with /container print detail.
1.2 Controller license
From ZeroTier One 1.16 the Controller is located in the nonfree source directory and is licensed for non-commercial use only. Commercial use requires a separate license from ZeroTier. See nonfree/LICENSE.md.
1.3 Secrets
Keep world-signing keys and root identity secrets in a protected location separate from all runtime directories. Nodes receive the Planet file only. Each node keeps its own identity.
2. Architecture and connection flow
| Component | Responsibility |
|---|---|
| Root server | VL1 discovery, rendezvous and relay |
| Planet | Local world definition identifying roots and their physical endpoints |
| Controller | Membership, authorization, certificates, IP assignments and managed routes |
| Gateway | Routing between a physical LAN and a ZeroTier network |
| Client | Joining virtual networks and exchanging traffic |
The Planet is a configuration file and not a service. A node acts as a root only when the world definition lists its identity as a root.
| Instance | Placement |
|---|---|
| Root 1 | CHR container |
| Root 2 | Separate Linux VM or server |
| Controller | Separate ZeroTier instance |
| Optional gateway | Separate CHR container |
| Clients | Windows and Linux machines |
Roots must not act as Controllers or join virtual networks.
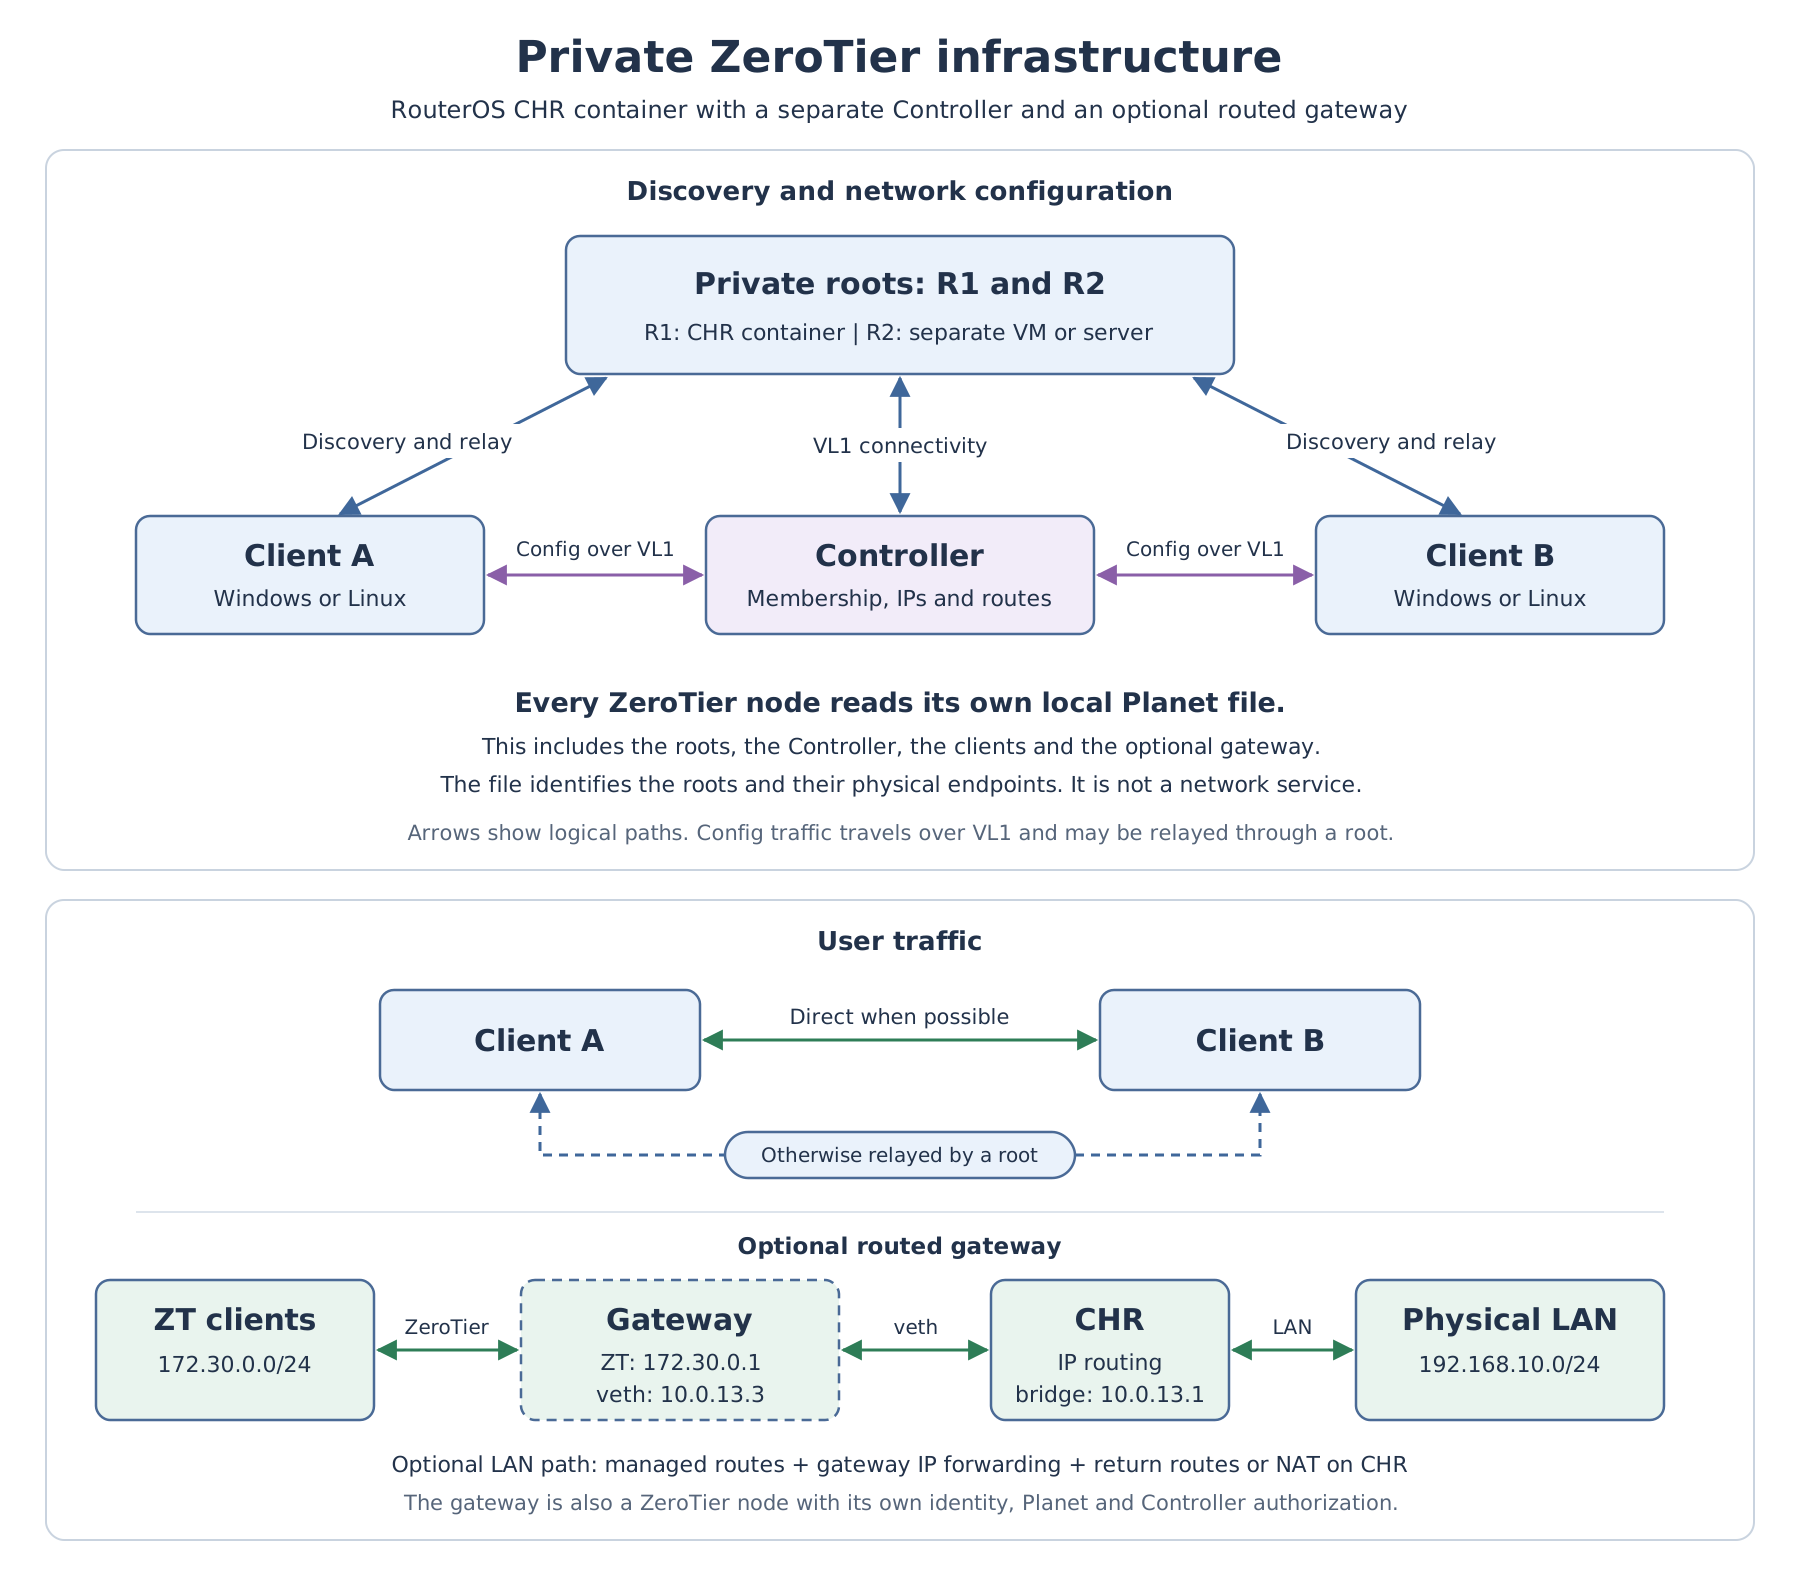
Startup flow:
- The node reads its local Planet file.
- It contacts roots using the physical endpoints in that file.
- A join request identifies the Controller through the first ten hexadecimal digits of the Network ID.
- VL1 provides a path to the Controller.
- The Controller authorizes the node and supplies network configuration.
- Nodes communicate directly where possible or through a root relay.
- An optional gateway routes traffic to the physical LAN.
Clients do not need the Controller's physical IP address.
3. Phase 0: Isolation from public infrastructure
Skip this section only if contact with ZeroTier's public infrastructure is acceptable.
If the planet file is missing or cannot be parsed ZeroTier One uses its built-in default Planet and contacts public roots. See Topology.cpp L50 to L61. Isolation therefore has to be enforced by the network and not only by the Planet file.
Apply before installing or starting ZeroTier on any node:
- Restrict underlay traffic to your roots, Controller, peers and required local infrastructure.
- Apply the restrictions to both IPv4 and IPv6.
- Include roots and Controller in the policy.
- Keep the restrictions active during installation since installers may start the service automatically.
- Install the private Planet and
local.confbefore the first service start.
The default TCP fallback relay is compiled in as 204.80.128.1/443. See OneService.cpp L151. Disable it through local.conf as shown in section 6.
4. Prepare CHR
Hyper-V is only an example and any other hypervisor supported by MikroTik works equally well with the matching CHR image.
Suggested allocation:
| Setting | Value |
|---|---|
| CPU | 2 vCPUs |
| RAM | 2 GB |
| System disk | CHR VHDX |
| Container storage | Separate 8 to 16 GB disk |
| Network adapters | WAN and LAN as required |
Verify the supported VM generation, disk controller and adapter types for your CHR release in MikroTik's CHR documentation.
The free CHR license limits upload throughput to 1 Mbit/s per interface. Choose a paid or trial tier that matches the required throughput.
Inspect the installation:
/system resource print
/system package print
/system license print
/system device-mode print
/disk print
Install the matching container package and complete its reboot.
Enable container mode:
/system/device-mode/update container=yes
On CHR the change is confirmed by a cold restart. Power the VM off and on through Hyper-V within the stated time. Verify the setting afterwards since /system reboot does not confirm it.
Prepare and mount the data disk. The examples assume its RouterOS path is disk1.
5. Create the container network
| Component | Address |
|---|---|
| CHR container bridge | 10.0.13.1/24 |
| Root 1 container | 10.0.13.2/24 |
| Optional gateway container | 10.0.13.3/24 |
| Physical LAN | 192.168.10.0/24 |
| ZeroTier network | 172.30.0.0/24 |
Replace angle-bracket placeholders before running commands.
/interface bridge
add name=br-zt-container

/interface veth
add name=vethZT address=10.0.13.2/24 gateway=10.0.13.1

/interface bridge port
add bridge=br-zt-container interface=vethZT

/ip address
add address=10.0.13.1/24 interface=br-zt-container
Outbound access through CHR NAT:
/ip firewall nat
add chain=srcnat src-address=10.0.13.0/24 \
    out-interface=<WAN> action=masquerade
5.1 Port forwarding for Root 1
Do not restrict the rule to the WAN interface. LAN nodes and a Root 2 at the same site that use the public endpoint must also match it:
/ip firewall nat
add chain=dstnat dst-address=<PUBLIC_IP> protocol=udp dst-port=9993 \
    action=dst-nat to-addresses=10.0.13.2 to-ports=9993
The container subnet and the LAN are separate routed subnets through CHR so no hairpin masquerade is needed. Add one only if the root and the connecting nodes share a subnet.
As an alternative or complement list both the external and the internal endpoint for Root 1 in stableEndpoints when generating the Planet.
The forward chain must permit the root's UDP traffic and replies before any drop rules. If an upstream router also performs NAT forward the port there as well. A directly routed root address does not need destination NAT.
Keep root endpoints reachable without depending on the ZeroTier overlay.
6. Prepare identities, Planet and local.conf
This section applies to all nodes.
6.1 Root identities
The root identities must exist before the Planet is generated. Create each pair on a trusted machine:
zerotier-idtool generate identity.secret identity.public
Transfer files to the CHR data disk through SFTP or Winbox. identity.secret must have mode 0600.
6.2 Planet distribution
| Node | Planet location |
|---|---|
| CHR root, RouterOS side | disk1/zerotier/planet |
| CHR root, inside container | /var/lib/zerotier-one/planet |
| CHR gateway, RouterOS side | disk1/zerotier-gateway/planet |
| Linux | /var/lib/zerotier-one/planet |
| Windows | C:\ProgramData\ZeroTier\One\planet |
Distribute the same Planet to every node. Copy files only while the service is stopped. Never edit the binary Planet as text.
This design does not use Moons. ZeroTier discourages new private Moon deployments.
6.3 local.conf
Roots:
{
  "settings": {
    "primaryPort": 9993,
    "portMappingEnabled": false,
    "allowSecondaryPort": false,
    "allowTcpFallbackRelay": false
  }
}
This limits the root to the advertised port and disables UPnP and NAT-PMP.
Controller, gateway and clients:
{
  "settings": {
    "allowTcpFallbackRelay": false,
    "softwareUpdate": "disable"
  }
}
Merge with existing settings and keep the JSON valid. These options disable TCP fallback and built-in updates. They do not select a Planet.
6.4 Container configuration source
The container entrypoint writes local.conf from ZEROTIER_LOCAL_CONF at every start and it writes identity files from ZEROTIER_IDENTITY_PUBLIC and ZEROTIER_IDENTITY_SECRET. See entrypoint.sh.release L18 to L39.
Choose one source per setting. If you manage local.conf as a file do not set ZEROTIER_LOCAL_CONF since manual changes are otherwise overwritten on restart.
7. Create the Root 1 container
/container mounts
add list=ZT_DATA src=disk1/zerotier dst=/var/lib/zerotier-one

/container config
set registry-url=https://registry-1.docker.io tmpdir=disk1/tmp

/container
add name=zt-root \
    remote-image=zerotier/zerotier:<IMAGE-TAG> \
    interface=vethZT \
    root-dir=disk1/containers/zt-root \
    mountlists=ZT_DATA \
    logging=yes \
    start-on-boot=no
Wait for extraction to finish and for status=stopped:
/container print detail
Keep the container stopped while provisioning. Place these files in disk1/zerotier:
identity.public
identity.secret
planet
local.conf
The identity must match Root 1's public identity in the Planet.
Back up the directory now before the first start.
8. Prepare Root 2 on Linux
- Apply the isolation policy from section 3.
- Install ZeroTier One and stop the service before first start where possible.
- Install Root 2's identity pair, the Planet and the root
local.confin/var/lib/zerotier-one. - Allow inbound UDP 9993 in the host firewall and any upstream NAT.
- Confirm that Root 2's advertised endpoint matches
stableEndpoints. - Back up the directory.
Permit root-to-root traffic in both directions.
9. Start the roots
On CHR:
/container start zt-root
/container print detail
/log print
/container shell zt-root
Inside the container:
zerotier-cli info
zerotier-cli listpeers
On Root 2:
sudo systemctl enable --now zerotier-one
sudo zerotier-cli info
sudo zerotier-cli listpeers
Each root should report ONLINE and list the other root. Client-side verification follows in section 13.
10. Configure the Controller
- Install the private Planet and
local.conf. Keep its own identity. - Start ZeroTier.
- Create a private network through the local Controller API.
- Configure an address pool and the connected managed route.
- Record the Network ID.
- Authorize nodes as they join.
| Setting | Value |
|---|---|
| Network type | Private |
| Connected managed route | 172.30.0.0/24 |
| Client assignment pool | 172.30.0.10 to 172.30.0.250 |
| Reserved gateway address | 172.30.0.1 |
Use the upstream Controller tutorial for the API requests. Keep the management API on localhost or a restricted management network.
11. Configure a Windows client
11.1 Install
Download the installer from the official download page. Install with administrative privileges while the isolation policy is active.
Get-Service ZeroTierOne
Stop-Service ZeroTierOne
11.2 Install Planet and local.conf
$zt = "C:\ProgramData\ZeroTier\One"
$backup = "$zt.backup.$(Get-Date -Format yyyyMMdd-HHmmss)"
Copy-Item -LiteralPath $zt -Destination $backup -Recurse
Copy-Item .\planet "$zt\planet" -Force
Keep the client's identity. Merge the client settings from section 6.3 into $zt\local.conf.
Start-Service ZeroTierOne
Set-Service ZeroTierOne -StartupType Automatic
11.3 Join and authorize
Run from an elevated prompt. If zerotier-cli.bat is not on PATH use its installed path.
zerotier-cli.bat info
zerotier-cli.bat join <NETWORK_ID>
zerotier-cli.bat listnetworks
Authorize the Node ID on the Controller. REQUESTING_CONFIGURATION may appear during contact. ACCESS_DENIED means authorization is pending. Expect OK afterwards.
11.4 Connectivity
zerotier-cli.bat listpeers
ipconfig /all
route print
ping <OTHER_ZEROTIER_IP>
Test-NetConnection <OTHER_ZEROTIER_IP> -Port <PORT>
Test-NetConnection -Port tests TCP. It does not test the roots' UDP transport.
11.5 Windows Firewall
New-NetFirewallRule `
  -DisplayName "Allow ICMPv4 from ZeroTier" `
  -Protocol ICMPv4 `
  -IcmpType 8 `
  -Direction Inbound `
  -Action Allow `
  -RemoteAddress 172.30.0.0/24
Use service-specific rules for TCP applications.
12. Configure a Linux client
These commands target Debian or Ubuntu with systemd.
12.1 Install
Install from ZeroTier's repository according to the download page. Keep the isolation policy active.
sudo systemctl stop zerotier-one
12.2 Install Planet and local.conf
sudo cp -a /var/lib/zerotier-one \
  /var/lib/zerotier-one.backup.$(date +%Y%m%d-%H%M%S)

sudo stat -c '%U:%G %a %n' /var/lib/zerotier-one
sudo systemctl cat zerotier-one

sudo install -m 0644 ./planet /var/lib/zerotier-one/planet
sudo chown --reference=/var/lib/zerotier-one \
  /var/lib/zerotier-one/planet
Keep the client's identity. Merge the client settings from section 6.3.
sudo systemctl enable --now zerotier-one
sudo systemctl status zerotier-one
12.3 Join and authorize
sudo zerotier-cli info
sudo zerotier-cli join <NETWORK_ID>
sudo zerotier-cli listnetworks
Authorize the Node ID. Read the interface name from the <dev> column in listnetworks.
ip -br address
ip route
ping -c 4 <OTHER_ZEROTIER_IP>
nc -vz <OTHER_ZEROTIER_IP> <PORT>
12.4 Linux firewall
sudo ufw allow from 172.30.0.0/24 to any port 22 proto tcp
Use equivalent rules for nftables or firewalld.
13. Verify private root usage
ONLINE alone does not prove that the private roots are used. From a client:
sudo zerotier-cli listpeers
Check that:
- Only the private roots appear with role
PLANET. - Their identities match the Planet definition.
- Their physical paths match the advertised endpoints.
- No traffic leaves toward public ZeroTier infrastructure in packet capture and firewall counters.
Run the test from a disposable client with fresh state. The client must reach the private roots and the Controller, obtain configuration and communicate with another client.
14. Optional: routed gateway
Skip this section if clients only communicate inside ZeroTier.
14.1 Create the gateway container
/interface veth
add name=vethZTgw address=10.0.13.3/24 gateway=10.0.13.1

/interface bridge port
add bridge=br-zt-container interface=vethZTgw

/container mounts
add list=ZT_GW_DATA src=disk1/zerotier-gateway \
    dst=/var/lib/zerotier-one

/container
add name=zt-gateway \
    remote-image=zerotier/zerotier:<IMAGE-TAG> \
    interface=vethZTgw \
    root-dir=disk1/containers/zt-gateway \
    mountlists=ZT_GW_DATA \
    logging=yes \
    start-on-boot=no
After extraction install the Planet and the gateway local.conf in disk1/zerotier-gateway. Use a separate identity.
/container start zt-gateway
/container shell zt-gateway
14.2 Check privileges
test -c /dev/net/tun && echo "TUN device present"
sysctl net.ipv4.ip_forward
sysctl -w net.ipv4.ip_forward=1
The presence of /dev/net/tun does not prove that the process can create a TAP interface. A network status of PORT_ERROR indicates missing privileges. If sysctl -w fails the container cannot forward and this design cannot be used as is.
The official image includes iproute2 and iputils-ping but not iptables or nc.
14.3 Join the network
zerotier-cli join <NETWORK_ID>
zerotier-cli listnetworks
ip -br address
Authorize the Node ID and assign 172.30.0.1.
14.4 Routing
| Location | Destination | Next hop |
|---|---|---|
| CHR | 172.30.0.0/24 |
10.0.13.3 |
| Controller managed route | 192.168.10.0/24 |
172.30.0.1 |
On CHR:
/ip route
add dst-address=172.30.0.0/24 gateway=10.0.13.3
The gateway reaches the LAN through its default route 10.0.13.1. No extra route is needed. ZeroTier does not install a managed route whose next hop is the node's own address. See OneService.cpp L3143.
Choose one return path for LAN hosts:
Option A: Routed. LAN hosts use CHR as their gateway or the existing LAN router routes 172.30.0.0/24 through CHR.
Option B: NAT on CHR. LAN hosts need no return route but see CHR as the source:
/ip firewall nat
add chain=srcnat src-address=172.30.0.0/24 \
    dst-address=192.168.10.0/24 action=masquerade
Allow the forwarding in the RouterOS forward chain.
Remote clients that are themselves on a local 192.168.10.0/24 network will get a route conflict. Plan the LAN subnet accordingly.
Persist ip_forward through the container's startup mechanism since a minimal container may not apply /etc/sysctl.conf.
15. Troubleshooting
15.1 Node status and network status
| Scope | State | Meaning |
|---|---|---|
| Node | ONLINE |
Root infrastructure is reachable |
| Node | OFFLINE |
Root infrastructure is unreachable |
| Node | TUNNELED |
TCP fallback relay is used |
| Network | REQUESTING_CONFIGURATION |
Configuration is being requested |
| Network | ACCESS_DENIED |
Authorization is required |
| Network | NOT_FOUND |
Check Network ID and Controller |
| Network | PORT_ERROR |
Virtual interface could not be created |
| Network | OK |
The network is operational |
A network without an IP may lack an address pool. Check Controller settings and client allowManaged before suspecting authorization.
15.2 Root traffic
Check that:
- The node has the intended Planet.
- Root identities match the definition.
- Advertised endpoints are reachable from every site including the LAN.
- NAT forwards UDP 9993 to the correct instance.
- Forward-chain rules permit traffic and replies.
- Root-to-root traffic is permitted.
- IPv4 and IPv6 policies match.
A TCP connection to port 9993 does not prove UDP reachability. A generic UDP probe does not prove a ZeroTier handshake.
15.3 Logs
sudo systemctl status zerotier-one
sudo journalctl -u zerotier-one -b
/container print detail
/log print
15.4 Gateway routing
Check each hop separately:
- Client to gateway ZeroTier IP.
- Gateway to
10.0.13.1. - Gateway to the LAN destination.
- Return path from the LAN destination.
- Firewall counters in RouterOS, gateway and destination.
16. Failure and recovery
| Action | Check |
|---|---|
| Stop Root 1 | A fresh client connects through Root 2 |
| Stop Root 2 | Repeat through Root 1 |
| Block direct traffic between two peers | Traffic relays through a private root |
| Stop the Controller | Compare existing traffic with new authorization requests |
| Restart a container | Identity and configuration survive |
| Restart CHR | Storage, services and routing recover |
| Power-cycle the VM | Automatic startup and persistence work |
| Fresh client with empty state | A new identity can be authorized |
| Remove or corrupt the Planet | Only with the isolation policy active. The node falls back to the built-in public Planet |
Existing direct traffic surviving a root shutdown does not prove root failover.
Reinstalling software does not necessarily remove state or create a new identity.
To change an endpoint generate and sign a new world definition.
17. Performance
iperf3 -s
iperf3 -c <SERVER_ZEROTIER_IP> -t 30
iperf3 -c <SERVER_ZEROTIER_IP> -t 30 -R
On Windows use iperf3.exe.
Record throughput, latency, peer path, CPU usage, software versions and CHR license tier. On CHR:
/tool profile
/system resource print
Measure direct peer traffic, root relay and gateway forwarding separately. Do not run packet capture during throughput tests. Results on the free CHR license are capped at 1 Mbit/s per interface.
18. Backup and automatic startup
RouterOS configuration:
/system backup save name=before-zerotier
/export file=before-zerotier
Back up each state directory with the service stopped:
| Instance | State directory |
|---|---|
| CHR root | disk1/zerotier |
| CHR gateway | disk1/zerotier-gateway |
| Linux | /var/lib/zerotier-one |
| Windows | C:\ProgramData\ZeroTier\One |
Include identities, planet, local.conf, networks.d and any controller.d or moons.d. For the Controller identity.secret and controller.d are the most important.
Keep Planet-generation inputs and signing secrets in a separate protected backup. Never run a restored identity concurrently with its original.
Enable startup:
/container set zt-root start-on-boot=yes
/container set zt-gateway start-on-boot=yes
Set-Service ZeroTierOne -StartupType Automatic
sudo systemctl enable zerotier-one
Confirm that gateway forwarding and firewall rules are restored after restart.
This guide was prepared with LLM assistance for drafting, structure, language and formatting.

