Bypassing AT&T Residential Gateways with MikroTik

Title:
Bypassing AT&T Residential Gateways with MikroTik

Welcome:
If you have AT&T FTTH service and would like to use your MikroTik hardware to its fullest potential, this article is for you. Discover how to connect directly to the Fiber ONT device, bypassing other middleware hardware. The AT&T provided Residential Gateway, aka the ATT RG router, might be one of: BGW210-700, BGW320-505, NVG589, NVG599, 5268AC, or any new models that might come out. These devices do provide value and are required if using VoIP service (IPTV requires IGMP-Proxy). For pure Internet only service, however, the gateways are not needed.

Why Bypass?
When it comes to a network rack or data closet, it is very frustrating to be forced into adding unnecessary hardware which will only take up space, use more power, generate heat, and become a point of failure in the network. Also, the best firewall and NAT device is a MikroTik! We want it to be the first thing that a packet must traverse. In this article we show you the how to do just that. Note that at all times we respect the AT&T network. This does not enable features you didn’t pay for. This article is a benefit to their subscribers. Not everyone is incapable of managing their own on-premises equipment. AT&T has allowed this method to exist for those who are responsible with it.

Hardware and Software requirements:
Faster hardware usually results in a better experience. If you have 1GB Fiber service or higher, consider using the RB4011, RB5009, CCR2004*, or other higher end models. The configurations presented here were tested with the RB4011 on DHCP residential service. The recommended RouterOS firmware for any model should be version 6.48.6+ or 7.6+.

Bypass Methods:
There are two methods presented here which are known as the Bridge Method and the Supplicant Method. These are explored in detail in the posts below. Choose the method that best meets your needs and application. A lot of individuals have contributed to this effort resulting in what we have today which include: devicelocksmith, aus, brianlan, maczrool, wojo, and others. Note that some ATT locations are being upgraded to support XGS-PON. This means that the bypass methods shown here will not work.

Technical Overview:
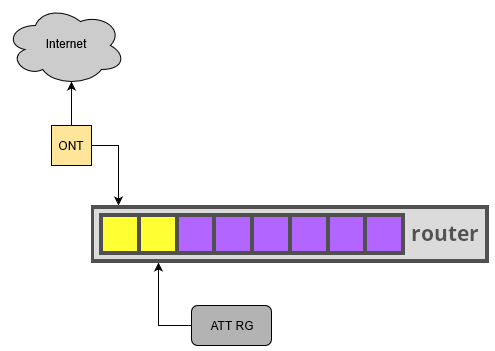
The nature of how this works is a little more technical than perhaps what you’re used to dealing with. I will largely repeat what aus has already written, but making changes to suit this article. Essentially, in a stock setting with the ATT RG as the first and only device connected directly to the Fiber ONT, we have:


  • ATT RG boots up
  • Initializing traffic to the ONT uses the 802.1X standard following the EAP-TLS Authentication Protocol (EAPOL). This is a fancy way of saying that there are unique encryption keys stored on the ATT RG that request authorization to connect and pass standard packets beyond the ONT.
  • After authentication, the Fiber ONT device will send ethernet frames as Cisco priority tagged frames. These follow the typical Dot1q (802.1Q) standard but with 0 set as the VLAN ID and some 802.1P bits set. There is not yet a requirement to reply with 802.1P packets.
  • With traffic tagged correctly, an ethernet port (its MAC address must match values in the encryption key) is given an IP address via DHCP. When the lease is issued, the WAN setup handshaking is complete. LAN traffic can now be routed.

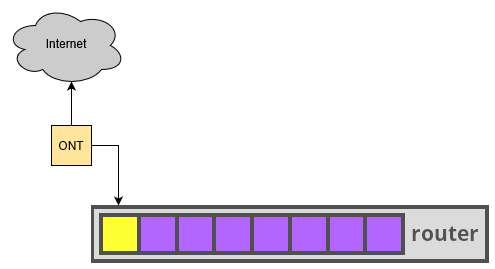
This process takes only a few moments but must be allowed to occur or you can emulate it exactly. Therefore, this article shows you how to bridge the 802.1X EAP-TLS traffic by allowing the ATT RG to do its thing, or you may natively import the encryption keys onto your MikroTik and utilize the Dot1x client interface. The choice is yours.

Bridge Method

Overview:
If you know anything about this option, then you know it has gone by several names: dumb switch bypass, eap-proxy, VLAN bypass, and true bridge mode. Well, they all share a common configuration in that they allow the ATT RG to handle the EAP-TLS protocol. After that, the RG can be powered down and removed. However, in the event of planned reboots or power failures, the ATT RG must be plugged back in. Naturally, the ATT RG can be allowed to stay powered on and ready as needed. Some have used special power adapters to turn the RG on and off automatically.

BridgeMethod.png
Details:
The diagram shows a yellow WAN bridge and a purple LAN bridge. The yellow bridge has temporary ports that enable the ATT RG to be nearly directly connected to the Fiber ONT. The bridge’s MAC address is thus the same as the RG. After EAP-TLS authentication occurs, the ether2 port is set to disabled. Standard routing and firewalling can then occur. The ATT RG can be removed or left on as desired.

Scripting:
MikroTik is powered by RouterOS. So, we can create bridges, add or remove ports, turn things on and off, all automatically with the included scripting ability. We are able to do a lot with a single hardware device. This method therefore uses some special scripts to accomplish our goal. Apply this script to your hardware.


##################################################################################################
# ABOUT:
#
# AT&T Residential Gateway Bypass using only a single MikroTik. No separate hardware or switch
# needed. Automatic recovery from reboot or power loss.
#
# Tested on the RB4011
#
# Date:   12-20-2019
# Topic:  http://forum.mikrotik.com/t/bypassing-at-t-residential-gateways-with-mikrotik/135563/1
#
##################################################################################################


##################################################################################################
# HOW TO INSTALL:
#
# 1) Reset MikroTik (/system reset-configuration) and reboot.
#
# 2) Edit "admin-mac=00:00:00:00:00:00" below to be your ATT RG MAC address.
#
# 3) With only the MikroTik turned on and nothing plugged in, apply this config file.
#
# 4) Next, turn everything else on and plug everything in.
#    ONT               <-> ether1
#    ATT RG ONT Port   <-> ether2
#    Your PCs etc.     <-> ether3~ether10
#
# 5) Reboot the MikroTik. The included script takes 3 minutes for automatic RG and ONT sycing.
##################################################################################################

# We will create two bridges. One for the LAN and the other for the WAN.
/interface bridge

# LAN
add name=Bridge_LAN protocol-mode=none

# WAN
# Set the WAN MAC (admin-mac) to be your ATT's RG MAC.
# We set the pvid parameter to a unique VLAN tag. A cheap way to keep incoming ONT and outgoing ether1 packets from seeing duplicate MACs.
# This way, only the ONT and ATT RG will see each other, not the momma Bridge with the duplicate MAC.
add name=Bridge_WAN admin-mac=00:00:00:00:00:00 pvid=111 auto-mac=no igmp-snooping=yes protocol-mode=none vlan-filtering=yes

# Add ports to each bridge
/interface bridge port

# WAN
add bridge=Bridge_WAN interface=ether1
add bridge=Bridge_WAN interface=ether2

# LAN
add bridge=Bridge_LAN interface=ether3
add bridge=Bridge_LAN interface=ether4
add bridge=Bridge_LAN interface=ether5
add bridge=Bridge_LAN interface=ether6
add bridge=Bridge_LAN interface=ether7
add bridge=Bridge_LAN interface=ether8
add bridge=Bridge_LAN interface=ether9
add bridge=Bridge_LAN interface=ether10

# Ready a DHCP client to pull an IP from the ATT ONT
/ip dhcp-client add dhcp-options=clientid disabled=no interface=Bridge_WAN use-peer-dns=no use-peer-ntp=no

# Add the script that enables automatic recovery from reboot or power loss
/system scheduler add name=OnRebootATT start-time=startup on-event=":delay 30\r\n/system script run OnRebootATT"
/system script add name=OnRebootATT source="#\_OnRebootATT\r\n\r\n:log info \"Script: Starting OnRebootStartATTRG\";\r\n:delay 5\r\n\r\n:log info \"Script: Enable Virtual switch for ONT and ATT RG\";\r\n/interface bridge set Bridge_WAN pvid=111\r\n\r\n:log info \"Script: Ensure ATT RG ether2 is visible to ONT\";\r\n/interface bridge port set bridge=Bridge_WAN [find interface=ether2] pvid=1\r\n/interface ethernet enable ether2\r\n\r\n:log info \"Script: Sleep for 3 minutes to allow ONT and ATT RG time to sync\";\r\n:delay 180\r\n\r\n:log info \"Script: Ensure ATT RG is NOT visible to ONT\";\r\n/interface bridge port set bridge=Bridge_WAN [find interface=ether2] pvid=222\r\n/interface ethernet disable ether2\r\n\r\n:log info \"Script: ONT and ATT RG should be in sync. Virtual Switch shutting down. Enjoy your router.\";\r\n/interface bridge set Bridge_WAN pvid=1\r\n"

# Standard MikroTik LAN configuration stuff. Modify to suit your LAN preferences
/ip pool add name=pool_LAN ranges=192.168.88.10-192.168.88.254
/ip dhcp-server add add-arp=yes address-pool=pool_LAN always-broadcast=yes disabled=no interface=Bridge_LAN lease-time=2d name=dhcp_LAN
/ip address add address=192.168.88.1/24 interface=Bridge_LAN
/ip dhcp-server network add address=192.168.88.0/24 dns-server=192.168.88.1 gateway=192.168.88.1
/ip dns set allow-remote-requests=yes servers="9.9.9.9,8.8.8.8"

# Sample Firewall
/ip firewall filter
add chain=input action=accept   connection-state=established,related comment="Allow established related"
add chain=input action=accept   in-interface=Bridge_LAN comment="Allow LAN"
add chain=input action=accept   protocol=icmp comment="Allow Ping"
add chain=input action=drop     comment="Drop all other input"
add chain=forward action=accept connection-state=established,related comment="Allow established related"
add chain=forward action=accept connection-state=new in-interface=Bridge_LAN comment="Allow LAN"
add chain=forward action=accept connection-nat-state=dstnat in-interface=Bridge_WAN comment="Allow port forwards"
add chain=forward action=drop   comment="Drop all other forward"

# Sample masquerade
/ip firewall nat add action=masquerade chain=srcnat comment="Default masq" out-interface=Bridge_WAN

# Example rule table switching for better performance if hardware support (RB3011, CCR1009).
# /interface ethernet switch rule add switch=switch1 ports=ether1 mac-protocol=0x888E new-dst-ports=ether2
# /interface ethernet switch rule add switch=switch1 ports=ether2 mac-protocol=0x888E new-dst-ports=ether1

Supplicant Method

Overview:
This option is the preferred way because the ATT RG can be stowed away while MikroTik hardware performs all necessary tasks. All that is required are valid certificates extracted from your ATT RG and a native supplicant client. MikroTik includes this client via their Dot1x interface which provides the wpa_supplicant feature.

SupplicantMethod.png
Details:
Our diagram looks like any normal routing configuration. Really, the only thing unique about this option is that we use a Dot1x client on our yellow ether1 WAN port. The purple ports are all bridged using typical RouterOS syntax. The ether1 MAC address is set to that of your AT RG certs and gets configured as a DHCP client. We must also import certificate files. Beyond that, the Dot1x handles the EAP-TLS authentication. A very straight forward configuration.

1. Manually Set the System Clock:
Set the clock, under System / Clock to be the correct time and date. This is a requirement of the Dot1x client otherwise you will get rejected, connecting, and authenticated without server error loops.

2. Import Certificate Files:
After you have obtained your certificate files, use the Winbox GUI tool and navigate to the Files menu. Drag and drop your files therein. Next, open the System / Certificates menu. Under the Certificates tab, click import and load your files. If possible, import the certs in the following order: CA, Client, then the PK. After importing, click Settings and uncheck CRL Download and Use CRL. You will now have approximately six new certificate files in your store. If you double click on an entry, you can see key usage information from the Key Usage tab. You will want to identify the one with tls client capability. Also in the General tab, you need a Common Name value as a MAC address, and that has Trusted checked. This is the correct key to use with Dot1x later.

3. Configure your WAN port:
For ROS v6 we’ll use ether1 in this example. Set it to be a standalone port, not part of a bridge etc. Run the following command, using your Common Name MAC address value: /interface ethernet set [ find default-name=ether1 ] mac-address=AA:BB:CC:DD:EE:FF. Next, setup a DHCP client on ether1, example command: /ip dhcp-client interface=ether1 add disabled=no. Some RouterBoard models also require the following command: /interface ethernet switch port set ether1 vlan-mode=fallback so that they will not drop packets coming from the ONT that have a VLAN id of 0.

For ROS v7 series firmware, we change the above slightly by needing to create a bridge to manage the ether1 interface. So, create a bridge BR_ATT setting protocol none, vlan filtering enabled, and ingress filtering can be unchecked. Then add ether1 to this bridge. Example commands: /interface bridge add name=BR_ATT ingress-filtering=no protocol-mode=none vlan-filtering=yes. /interface bridge port add bridge=BR_ATT ingress-filtering=no interface=ether1. Next, you need to enable a DHCP client on BR_ATT, instead of simply using ether1 as ROS v6 does. The mac address of the bridge will assume ether1 underlying mac address.

4. Configure the Do1x interface:
This is easy enough in the GUI, but I’ll show the command line. Note that you specify the file name that had tls client capability. Set the identity fields to be the correct MAC address (without the colons). Command: /interface dot1x client add interface=ether1 certificate=Client_myfile.pem eap-methods=eap-tls identity=AABBCCDDEEFF.

Conclusion:
At this point everything is ready. Configure the rest of your MikroTik as desired, then reboot the unit. Plug ether1 directly into the Fiber ONT. In the Dot1x GUI, you will note the Status field. After about 30 seconds, it will read authenticated then you’ll have an IP address on ether1 or BR_ATT.

Reserved

Reserved

Hi, thanks for this tutorial, and the hard work. I tried this new method with my router, I’m waiting for the new one, I think I got authorization but for some reason I never have an ip address. The message that I received under the dot1.x is authenticated without server . Any idea. Thanks

I’m very new to this, so I don’t know all the edge cases yet. The Dot1x documentation mentions it and states access to the port is granted without communication with server. Not sure what that means. Can you do a packet capture on the traffic? Makes me think that perhaps you need a certain VLAN tag. Do you have business or residential service? Also, turn off everything, the Fiber ONT too for a few minutes. Then boot up again.

I have a residential account, I’m going to try with the new Mikrotik when it arrive. Right now I’m using my old one for this test. Like you told me before under powered maybe is the router because is the model crs109-8G. The new one is the CCR1009. Thanks

I’m still unable to have any IP traffic pass due to the VLAN 0 tagging. Nothing has changed for me, must be a configuration that is regional or something.

That said, since I was able to get it working in two phases, this time I automated it. The idea is to have a script monitor things and automatically take the interface in and out of the bridge based on the 802.1x status.

On my CCR1009-7G-1C-1S+ (passive cooled, 1200MHz), I barely break 6% overall CPU with quite a few rules (optimized though), fast path, etc at 1Gbps.

The entire setup is as follows:

Replace the following with your values:

  • bridge-ont - the bridge that strips VLAN 0 tags, has one interface on it that connects to the ONT
  • ether3-ont - the interface connected directly to the ONT
  • 00:00:00:00:00:00 - the MAC address that matches the 802.1x cert bundle that you’ve uploaded
  • name_of_cert - upload your cert bundle and select this in the dot1x settings

Set up the interfaces, bridge and dot1x:

/interface ethernet set [find name=ether3-ont] mac-address=00:00:00:00:00:00

/interface bridge add admin-mac=00:00:00:00:00:00 auto-mac=no name=bridge-ont protocol-mode=none vlan-filtering=yes
/interface bridge port add bridge=bridge-ont interface=ether3-ont

/interface dot1x client add anon-identity=00:00:00:00:00:00 certificate=name_of_cert eap-methods=eap-tls identity=00:00:00:00:00:00 interface=ether3-ont
/certificate settings set crl-use=no

This is the script that I run every 5 seconds, which is probably overkill, but it doesn’t write any config changes or log anything unless something changes so should be fine in terms of NAND wear, etc. I’ll probably tune it down to every minute later.

:local interfaceOnt "ether3-ont"
:local bridgeOnt "bridge-ont"

:local scriptName "CheckDot1x"
:local dot1xStatus [/interface dot1x client get [find interface=$interfaceOnt] status]
:local portDisabled [/interface bridge port get [find bridge=$bridgeOnt interface=$interfaceOnt] disabled]

#:log info "$scriptName: Checking, dot1xStatus=$dot1xStatus, portDisabled=$portDisabled"

:if ($dot1xStatus = "authenticated") do={
  :if ($portDisabled) do={
    :log warn "$scriptName: authenticated, enabling bridge"
    /interface bridge port enable [find bridge=$bridgeOnt interface=$interfaceOnt]
  }
} else={
  :if (!$portDisabled) do={
    :log warn "$scriptName: not authenticated ($dot1xStatus), disabling bridge"
    /interface bridge port disable [find bridge=$bridgeOnt interface=$interfaceOnt]
  }
}

For easy adding:

/system script add dont-require-permissions=no name=CheckDot1x owner=admin policy=read,write,policy,test source=":local interfaceOnt \
    \"ether3-ont\"\
    \n:local bridgeOnt \"bridge-ont\"\
    \n\
    \n:local scriptName \"CheckDot1x\"\
    \n:local dot1xStatus [/interface dot1x client get [find interface=\$interfaceOnt] status]\
    \n:local portDisabled [/interface bridge port get [find bridge=\$bridgeOnt interface=\$interfaceOnt] disabled]\
    \n\
    \n#:log info \"\$scriptName: Checking, dot1xStatus=\$dot1xStatus, portDisabled=\$portDisabled\"\
    \n\
    \n:if (\$dot1xStatus = \"authenticated\") do={\
    \n  :if (\$portDisabled) do={\
    \n    :log warn \"\$scriptName: authenticated, enabling bridge\"\
    \n    /interface bridge port enable [find bridge=\$bridgeOnt interface=\$interfaceOnt]\
    \n  }\
    \n} else={\
    \n  :if (!\$portDisabled) do={\
    \n    :log warn \"\$scriptName: not authenticated (\$dot1xStatus), disabling bridge\"\
    \n    /interface bridge port disable [find bridge=\$bridgeOnt interface=\$interfaceOnt]\
    \n  }\
    \n}"
    
/system scheduler add interval=5s name=CheckDot1x on-event=CheckDot1x policy=read,write,policy,test start-time=startup

Finally place your DHCP on the “bridge-ont” interface. I’m able to pull both IPv4 and a /60 of IPv6, which I’ve split up into three /64 subnets for my private network, IoT and guest networks.

Sadly with the new Mikrotik CCR1009 I’m still have the same message “Authenticaded without server” and no IP address. I also tried the script to verify the Dot1x status and no luck. Looking for any help. Thanks

I think I’ve hit that when something was wrong with the certs or dot1x setup. Can you show your configuration with MACs scrubbed and such for dot1x and certificate settings?

Also – I can’t remember entirely if it was required but I did import the entire cert chain as well as disable the CRL.

Yes, I just tested my system again (resetting everything for testing) and get the same error. I’ll be tracking this down. For now, set your system clock to the correct time. Also, make sure, under System Certificates, that your Client key is KT.

Interestingly, when I restore my system from backup, everything works. So, there is something stored in the backup file, that simply enables an ether1 interface to just work without putting into bridge, then removing, as wojo is having to.

This is part of my config without the Dotx1 check. I imported the 3 certificates (CA_00…, Client_00.., PrivateKey_PKCS1_00..) that was created when using the utility for create the wpa_supplicant.conf

interface ethernet
set [ find default-name=ether1 ] mac-address=xx:xx:xx:xx:xx:xx
set [ find default-name=ether2 ] name=ether2
set [ find default-name=ether3 ] name=ether3
set [ find default-name=ether4 ] name=ether4
set [ find default-name=ether5 ] name=ether5
set [ find default-name=ether6 ] name=ether6
set [ find default-name=ether7 ] name=ether7
/interface bridge port
add bridge=Bridge_LAN interface=ether2
add bridge=Bridge_LAN interface=ether3
add bridge=Bridge_LAN interface=ether4
add bridge=Bridge_LAN interface=ether5
add bridge=Bridge_LAN interface=ether6
add bridge=Bridge_LAN interface=ether7

/interface bridge settings
set use-ip-firewall=yes
/interface dot1x client
add anon-identity=xxxxxxxxxxxx certificate=Client_cert.pem_0
eap-methods=eap-tls identity=xxxxxxxxxxxx interface=ether1

I change the clock with right date and time, import the certificates again, use the one with KT with the DOTx . And the same message. Thanks

Okay, I think what may have happened is that I too had a bridge, then took it out of the bridge. After that, is stays working. Please try wojo scripts. I will keep looking until I find the answer.

I remove the WAN Bridge, ether1 is alone, the only bridge that I have is for the LAN. Do I need to remove the LAN_Bridge and create a new one for the LAN?

No, the LAN side is fine. What we are doing is fairly advanced here. I understand it must be confusing for you. We are only talking about WAN interfaces.

OK, eth1 is alone without any WAN_Bridge. And no WAN_Bridge. I’m going to try the Dotx Script. Thanks

Well, after going around and around with this, I was finally able to get it to work with only using ether1. The system time must be correct. Set that, then reboot.

I got bit by the same thing when first starting as well, until I started throwing reboots and disconnects at the situation.

Well… the scripts aren’t ideal, but are fast and seem to be reliable so far. Like you said, the ONT doesn’t seem to ask for reauth once up, ever.

If dot1x ever reports it’s not auth’d the script will at least try to let it do it again by taking the interface out of the bridge. I’m just scared if the ONT decides to unauth without a link drop/status change, nothing would not notice.

In order to catch that situation, would need to test the gateway and try bouncing or something I guess.