Using RouterOS to QoS your network - 2020 Edition

Title:
Using RouterOS to QoS your network - 2020 Edition

Welcome:
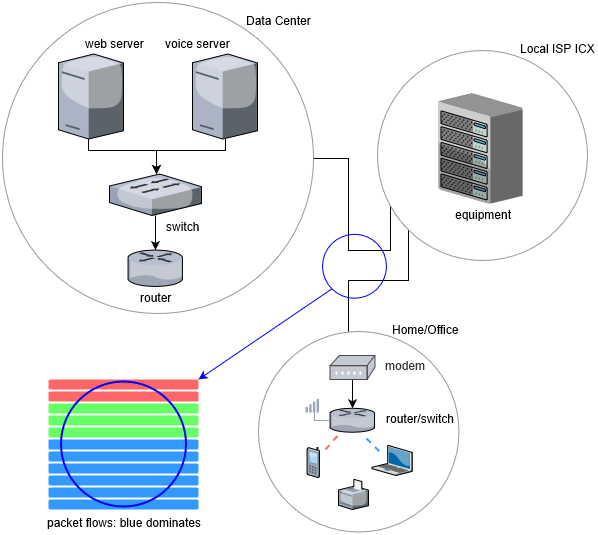
The following article is a high-level introduction to a QoS implementation using MikroTik RouterOS. Quality of Service is a large topic. So, this short article will not attempt to explain all edge cases, compare the many algorithms, or provide deep context on packet prioritization. However, it is possible to achieve good - even fantastic results - by creating simple classifications and actions on the most common traffic flows. The configuration presented here is suitable for small business, home, ip telephony, and gaming environments where a single device is providing QoS management.

Why prioritize traffic?
Generally speaking because there is network contention. This occurs most commonly because two or more applications are requesting enough data to exceed the interface. Maybe you want to plan ahead knowing there will be congestion. Even when individual applications and protocols are managing themselves well, they are not aware of the effect they are having on the rest of the network. QoS is then a network governor watching all packet flows and making good decision for everyone. Since network interfaces operate in a serial manner, interactive traffic will be waiting on the many packets ahead of it from big bulky traffic. Even if you could afford to add more Internet connections and more routers, it is still possible to overwhelm them. Therefore, prioritizing your network is a QoS mechanism to manage the different types of traffic flows.

Traffic Types:
You need to classify at least three: interactive, network, and then bulky. For the purposes of this article, VoIP packets are interactive traffic and considered the most important. The network traffic consists of DNS, ICMP, and ACK packets. For the bulky category we have HTTP and QUIC. We also have a catch all for everything else which gets the lowest priority. When our highly interactive traffic is occurring we will ensure it is never impeded by the other types. Indeed, all other traffic types will have secondary importance for the duration of VoIP packet flows, but only when the network is under threat of congestion. Use our model as a guide and create your own categories.

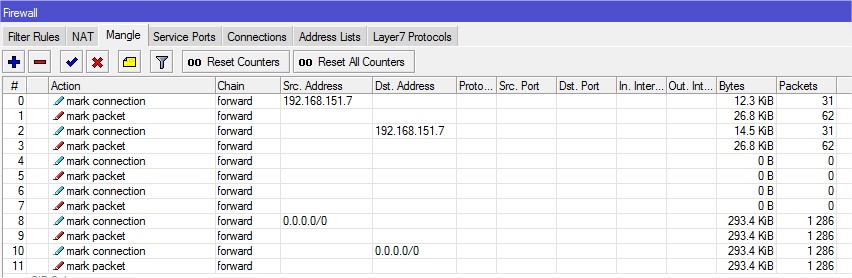
How to identify Traffic Types:
There are actually quite a few ways. Some applications have standard port numbers like DNS. Maybe you have equipment setting DSCP bits for you. You could also check ip addresses, mac addresses, or even VLAN IDs to know the importance of packets coming from those locations. It is also possible to check byte rates to identify streaming traffic. Knowing the types of applications in use and their bandwidth requirements will help you to correctly know what is important or at least what category it should go in.

TrafficTypes.png
How Interfaces and QoS work together:
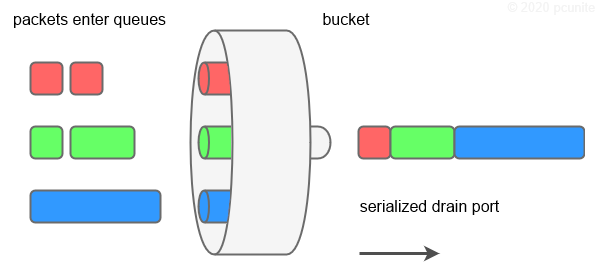
It is helpful to understand a little bit about interfaces, queuing, and shaping before we jump right into the implementations. Think of interfaces as buckets and packets as different color liquids. These buckets have a drain port at the bottom to let out the liquid. Nozzles are pouring red, green, and blue liquid into our bucket. Thus we have two considerations: the speed of the drain port and the size of the bucket.

If five packets arrive every 5 minutes, it is easy to reason that our bucket can handle that just fine. But if 10,000 packets arrive every second we are going to have a problem. We could speed up the port, say with a 100GbE interface. But there are side-effects to doing that and it is not always affordable to go with faster interfaces. We could get a bigger bucket. A bucket so big that it could hold an elephant. Unfortunately we have the situation to where the last drop of red may take too long waiting for all that blue to drip out. No matter the speed of our drain port or the size of the bucket, it can be so utilized that it can not keep up with incoming data. Our bucket can overflow, throwing away some of the packets.

When we QoS packets, we do make use of port and bucket characteristics, but we also notify those pouring nozzles to release in a more responsible way for our capacity. If they don’t, then we take matters into our own hands to ensure the packets we care about the most don’t overflow. With QoS this is done by dropping packets. Naturally, some packets can’t be dropped without effecting the application experience. We plan accordingly.

Disclaimer:
What follows is my best understanding of how to implement the stated goals. FastTrack must not be enabled. Feedback from MikroTik as well as fellow forum members is required to make this an accurate document. Please suggest changes that should be made. Let’s make this issue a commonly understood one. Special thanks to bharrisau for testing and feedback.

Implementing traffic prioritization (QoS) with RouterOS

To turn on the QoS capabilities of RouterOS, we implement two things: marking and then queuing.

The Marking Stage

How to Mark the Traffic Types:
RouterOS supplies the Mangle feature to mark packets. What you decide to mark is up to personal and business decisions. Here is a sample starting point. It can be appropriate to mark items, interesting to you, that will ultimately go into the same queue. This is useful for network monitoring purposes. The POP3 mark is an example of that.

Take time to get your marking correct. Test to ensure you are seeing the totals move as you expect. At this stage, we are only marking items. We will use another command to take actions on these marks.


/ip firewall mangle
# Identify DNS on the network or coming from the Router itself
add chain=prerouting  action=mark-connection connection-state=new new-connection-mark=DNS port=53 protocol=udp passthrough=yes comment="DNS"
add chain=prerouting  action=mark-packet     connection-mark=DNS  new-packet-mark=DNS passthrough=no
add chain=postrouting action=mark-connection connection-state=new new-connection-mark=DNS port=53 protocol=udp passthrough=yes
add chain=postrouting action=mark-packet     connection-mark=DNS  new-packet-mark=DNS passthrough=no

# Identify VoIP
add chain=prerouting  action=mark-connection new-connection-mark=VOIP port=5060-5062,10000-10050 protocol=udp passthrough=yes comment="VOIP"
add chain=prerouting  action=mark-packet     connection-mark=VOIP new-packet-mark=VOIP passthrough=no

# Identify HTTP/3 and Google's QUIC
add chain=prerouting  action=mark-connection connection-state=new new-connection-mark=QUIC port=80,443 protocol=udp passthrough=yes comment="QUIC"
add chain=prerouting  action=mark-packet     connection-mark=QUIC new-packet-mark=QUIC passthrough=no

# Identify UPD. Useful for further analysis. Should it be considered high priority or put in the catchall? You decide.
add chain=prerouting  action=mark-connection connection-state=new new-connection-mark=UDP protocol=udp passthrough=yes comment="UDP"
add chain=prerouting  action=mark-packet     connection-mark=UDP  new-packet-mark=UDP passthrough=no

# Identify PING on the network or coming from the Router itself
add chain=prerouting  action=mark-connection connection-state=new new-connection-mark=ICMP protocol=icmp passthrough=yes comment="ICMP"
add chain=prerouting  action=mark-packet     connection-mark=ICMP new-packet-mark=ICMP passthrough=no
add chain=postrouting action=mark-connection connection-state=new new-connection-mark=ICMP protocol=icmp passthrough=yes
add chain=postrouting action=mark-packet     connection-mark=ICMP new-packet-mark=ICMP passthrough=no

# Identify Acknowledgment packets
add chain=postrouting action=mark-packet     new-packet-mark=ACK packet-size=0-123 protocol=tcp tcp-flags=ack passthrough=no comment="ACK"
add chain=prerouting  action=mark-packet     new-packet-mark=ACK packet-size=0-123 protocol=tcp tcp-flags=ack passthrough=no

# Identify HTTP traffic but move it to a Streaming mark if necessary.
add chain=prerouting  action=mark-connection connection-mark=no-mark  connection-state=new new-connection-mark=HTTP port=80,443 protocol=tcp passthrough=yes comment="HTTP"
add chain=prerouting  action=mark-connection connection-bytes=5M-0    connection-mark=HTTP connection-rate=2M-100M new-connection-mark=HTTP_BIG protocol=tcp passthrough=yes
add chain=prerouting  action=mark-packet     connection-mark=HTTP_BIG new-packet-mark=HTTP_BIG passthrough=no
add chain=prerouting  action=mark-packet     connection-mark=HTTP     new-packet-mark=HTTP passthrough=no

# Email goes to the catchall
add chain=prerouting  action=mark-connection connection-state=new new-connection-mark=POP3 port=995,465,587 protocol=tcp passthrough=yes comment="OTHER"
add chain=prerouting  action=mark-packet     connection-mark=POP3 new-packet-mark=OTHER passthrough=no

# Unknown goes to the catchall
add chain=prerouting  action=mark-connection connection-mark=no-mark new-connection-mark=OTHER passthrough=yes
add chain=prerouting  action=mark-packet     connection-mark=OTHER   new-packet-mark=OTHER passthrough=no

The Queuing Stage

How to act on Traffic Marks:
RouterOS supplies the Queue Tree structure that enable us to act on marks. This is how we truly classify the packet flows on the network. A whole book could be written on what is occurring here. There are many options one could use to dial in a very custom Queue Tree. The purpose of this article, however, is to present a simple yet very effective implementation. A few things do need to be understood.

Max-limit:
In order for queuing to occur in our equipment, and thus give us the control on packet flows, we have to set our interfaces to operate at 10% the rate of our ISP connection. This is only a starting number and is dependent upon your CPU speed and simultaneous connections. Apply to both the upload and download links. This way buffering always occurs inside of our equipment. The max-limit parameter is required for the algorithms to function and must not be 0. In our example, we have 100M service, so we have set it to 90M.

Limit-at:
This option is not something you will use commonly and is therefore recommended to leave it at 0 (disabled). However, there is a very special situation where you must enable it. Read the Protection with Limit-at section to learn more.

bucket-size:
During congestion, this value sets the amount of tokens to accrue before the chosen queue type takes effect. This is an equation and means that after Max-limit is reached (bucket-size * max-limit) worth of bytes will be engaged by the queue type. For our purposes, we only want a small amount of time addressing packets going over the limit, enough to smooth out any protocol windowing.


/queue tree

# DOWN
add name=DOWN max-limit=90M parent=LAN bucket-size=0.01 queue=default

add name="1. VOIP"     packet-mark=VOIP     parent=DOWN priority=1 queue=default
add name="2. DNS"      packet-mark=DNS      parent=DOWN priority=2 queue=default
add name="3. ACK"      packet-mark=ACK      parent=DOWN priority=3 queue=default
add name="4. UDP"      packet-mark=UDP      parent=DOWN priority=3 queue=default
add name="5. ICMP"     packet-mark=ICMP     parent=DOWN priority=4 queue=default
add name="6. HTTP"     packet-mark=HTTP     parent=DOWN priority=5 queue=default
add name="7. HTTP_BIG" packet-mark=HTTP_BIG parent=DOWN priority=6 queue=default
add name="8. QUIC"     packet-mark=QUIC     parent=DOWN priority=7 queue=default
add name="9. OTHER"    packet-mark=OTHER    parent=DOWN priority=8 queue=default


# UP
add name=UP max-limit=90M parent=WAN bucket-size=0.01 queue=default

add name="1. VOIP_"     packet-mark=VOIP     parent=UP priority=1 queue=default
add name="2. DNS_"      packet-mark=DNS      parent=UP priority=2 queue=default
add name="3. ACK_"      packet-mark=ACK      parent=UP priority=3 queue=default
add name="4. UDP_"      packet-mark=UDP      parent=UP priority=3 queue=default
add name="5. ICMP_"     packet-mark=ICMP     parent=UP priority=4 queue=default
add name="6. HTTP_"     packet-mark=HTTP     parent=UP priority=5 queue=default
add name="7. HTTP_BIG_" packet-mark=HTTP_BIG parent=UP priority=6 queue=default
add name="8. QUIC_"     packet-mark=QUIC     parent=UP priority=7 queue=default
add name="9. OTHER_"    packet-mark=OTHER    parent=UP priority=8 queue=default

Additional Information:
Since QoS is such a big topic, additional information is presented here for those who want to dive a little deeper. While the example configuration is simple to understand and explain, we should go further in the real world. Also read the Bufferbloat article.

Protection with Limit-at:
In the event that traffic volume, for one particular queue, reaches at least 51% of the Max-limit value, that traffic will be subject to packet prioritization. This means packets might get dropped. This is normal and the whole point of what we are doing. But, what if that queue is your high priority queue? There is a way to carve out some protection for these special packets.

To illustrate how this is done, we’ll demonstrate with VoIP packets flowing in our VOIP queue. Each VoIP call is about 86Kb, both directions. Let’s say we have to protect 700 active calls to support a business contract. At 86Kb, that works out to be about 60M, which is indeed over 51% of our 90M Max-limit. Thus we set a Limit-at of 60M, on the VOIP queue only (both up & down). This will prevent those packets from ever being dropped. If you only ever expect 10 VoIP calls then Limit-at would be unnecessary.

Protection for low priority queues with Limit-at:
Why offer any protection for a low priority queue? If you have enough bandwidth to go around, it is a very good idea to carve out a minimum amount of bandwidth for busy queues. Otherwise, all higher priority queues will take nearly everything under ultra-high contention events. Thus, you could ensure at least 10M or more if you can afford it. QUIC and HTTP_BIG are queues that could use some level of protection.

Limit-at Qualifiers:


  • You can’t protect more bandwidth than you actually have.
  • Protection for one queue (only when under pressure) naturally forces the other queues to battle over what’s left.
  • Attempting to protect more than 90% is risky. Better to increase bandwidth instead.
  • Not everything on your network should be high priority. If so, then in reality, you only have one queue.

Implement like so:


# Set protection on VOIP queue, both directions. Also some for HTTP_BIG.
/queue tree 
add limit-at=60M max-limit=90M name="1. VOIP" packet-mark=VOIP parent=DOWN priority=1 queue=default
add limit-at=60M max-limit=90M name="1. VOIP_" packet-mark=VOIP parent=UP priority=1 queue=default
add limit-at=10M max-limit=90M name="7. HTTP_BIG" packet-mark=HTTP_BIG parent=DOWN priority=7 queue=default
add limit-at=10M max-limit=90M name="7. HTTP_BIG_" packet-mark=HTTP_BIG parent=UP priority=7 queue=default

Optimizing the HTTP, HTTP_BIG, and QUIC queues:
Any queue that frequently hits the Max-limit value and has packets using global synchronization, Cubic, NewReno, or similar congestion methods, will benefit from a better queuing mechanism. Therefore, it is recommended to use RED (Random Early Detection) on these queue types. Note that WRED is an often mentioned improved version that looks at priority data in the packet. However, since we are placing packets in their own special queue anyway, we have already classified what is important.

Implement like so:


/queue type

# default queue behavior
set default kind=sfq

# queue behavior for streaming type traffic
add kind=red red-avg-packet=1514 name=redCustom

# example of how to use red, optionally set for all bulky traffic types
add name="7. HTTP_BIG" packet-mark=HTTP_BIG parent=DOWN priority=6 queue=redCustom
add name="7. HTTP_BIG_" packet-mark=HTTP_BIG parent=UP priority=6 queue=redCustom

How Buffering and Bufferbloat in ISP supplied equipment affects QoS and latency sensitive protocols

Understanding this phenomenon is really tricky. It helps to know how applications, network controllers, protocols, and memory all behave in isolation. As networks have grown in size and complexity, all these elements have accidentally worked together to increase Latency, the enemy of networking.

Applications:
Software applications send their data to receivers in chunks or packets about 1Kb in size. If Application 1A sends a packet destined for Application 1B, it waits for a moment, to see if it gets a reply. During this wait, other applications may try to say something. Now we have an interleaving amount of traffic coming and going. To make full use of this highway (bandwidth), applications start slowly sending data. As they get acknowledgment replies back that they are being heard, they increase the rate of packets they send. Applications try to send as much as they can.

Controllers:
Network interfaces, whether exposed as a Cat5-7, fiber ports, or wifi, are connected to a controller that is ultimately managed by low level software. This implies memory, and is what is used to hold the incoming bits that eventually make up an individual packet. As the bits come in, one by one, a whole packet is realized as it comes in off the wire. The first packet might belong to Application 1. The next packet might belong to Application 2. The next 30 packets might all belong to Application 3. A natural question might then be: how many packets should network controllers, routers, and switches store?

Protocols:
When a sending application does not receive a reply (ACK packet), within a certain time window, it begins to slow down its sending rate. It will slow down until it is heard, at which point is starts increasing again. It can enter a timeout period if it is never heard. If this happens to a graphical app, it may appear to freeze. If a file download is in progress, timeouts make the network seem “slow” or even “down”. The reply window and timeouts work well when there is one type application on the network. But today, there is almost never one type of application or even one type of packet flow.

Memory:
Memory is plentiful these days. Since packets might only be 1Kb in size, it is cheap to hold a lot of them. But it stands to reason that at some point, room for holding packets is going to run out. When that happens, the network controllers start to drop packets and their buffers overflow. As applications realize they are not getting acknowledgments they begin to slow down too freeing up memory pressure. The cycle is then repeated.

PacketPath.png
Everything described so far is correct behavior, as designed, and works well under certain conditions. However, conditions and what is expected of a network have changed. Networks are not used to simply download things or view web pages any more. Increasingly, there is interactive traffic.

The interactive packet:
As packets get stored by the network, every so often a tiny little packet needs to be sent. These come from applications that want to send and reply in a loop with small amounts of data indicating state. Yet, the network is completely full causing any new packet to wait behind long lines of bulky traffic. Because of this, controllers are overflowing their buffers all along the way. Our small packets are getting dropped too. We are now experiencing Latency.

Latency:
The amount of time for a packet to get its reply. This is what makes a network feel fast or slow. There will always be a delay but how much is too much? For certain applications, that is about 150ms. If these packets are for voice or game data, the end user will think the network is unstable. Yet, big downloads, running in the background or on other system, finish and no one perceives any issues.

Buffer collapse:
Because of the way networks store packets in buffers, sending applications get bandwidth and priority that should not be available to them. When buffers along the way are seemly accepting everything being sent, applications increase their packet flow rates, never leaving room for interactive applications. At some point in time, random buffers begin to be completely maxed out. Packets get dropped, acknowledgments are not sent. Sending applications slow down. Unfortunately, they all do this at once. Then all applications ramp back up, then they all slow down again. The network is weaving back and forth inefficiently. This affects bulky traffic, and most certainly never properly allows for interactive traffic to work as needed.

Solution:
On the ISP side, buffers sized appropriately and matched to processor, controller, and bandwidth sizes and speeds. On the client side, Active Queue Management techniques as shown in this article series. The ISP may never know what you consider to be your most important traffic, so for both your up-link and down-link interfaces, you must ensure to manage your own buffers, control what overflows, and determine which packets should be dropped to signal packet rates.

Reserved

Reserved

great info, but it’s better to use http://wiki.mikrotik.com for such articles - forum is more for questions, not for tutorials :slight_smile:

Thank you. My intention was to perfect this post and then have it accepted by MikroTik after all the experts had confirmed it. Then, as you say, have it posted in the Wiki.

Good idea. Waiting for next parts.

just add two rules at the bottom of the script
first mark-connection with dst-address=0.0.0.0/0 (nothing else)
second mark-packet with connection mark you set on the first rule (BULK i think you named both marks).

It doesn’t work.

Here’s what I have:


/ip firewall mangle

add chain=forward action=mark-connection src-address=192.168.151.7 new-connection-mark=VOIP
add chain=forward action=mark-packet passthrough=yes connection-mark=VOIP new-packet-mark=VOIP
add chain=forward action=mark-connection dst-address=192.168.151.7 new-connection-mark=VOIP
add chain=forward action=mark-packet passthrough=no connection-mark=VOIP new-packet-mark=VOIP

add chain=forward action=mark-connection dst-address-list=IPTVlist new-connection-mark=IPTV
add chain=forward action=mark-packet passthrough=yes connection-mark=IPTV new-packet-mark=IPTV
add chain=forward action=mark-connection src-address-list=IPTVlist new-connection-mark=IPTV
add chain=forward action=mark-packet passthrough=no connection-mark=IPTV new-packet-mark=IPTV

add chain=forward action=mark-connection src-address=0.0.0.0/0 new-connection-mark=BULK
add chain=forward action=mark-packet passthrough=yes connection-mark=BULK new-packet-mark=BULK
add chain=forward action=mark-connection dst-address=0.0.0.0/0 new-connection-mark=BULK
add chain=forward action=mark-packet passthrough=no connection-mark=BULK new-packet-mark=BULK

/queue tree

add name=“TOTAL_U” parent=pppoe-out1 queue=default priority=8 limit-at=0 max-limit=680k
add name=“TOTAL_D” parent=bridge-homelan queue=default priority=8 limit-at=0 max-limit=4300k

add name=“VOIP_U” parent=TOTAL_U packet-mark=VOIP queue=default priority=1
add name=“VOIP_D” parent=TOTAL_D packet-mark=VOIP queue=default priority=1

add name=“IPTV_U” parent=TOTAL_U packet-mark=IPTV queue=default priority=2
add name=“IPTV_D” parent=TOTAL_D packet-mark=IPTV queue=default priority=2

add name=“BULK_U” parent=TOTAL_U packet-mark=BULK queue=default priority=8
add name=“BULK_D” parent=TOTAL_D packet-mark=BULK queue=default priority=8

/ip firewall address-list
add address=184.84.243.193 list=IPTVlist
add address=4.27.18.126 list=IPTVlist


In mangle I see exactly same counts for src and dst on each marking portion, which makes me think that mangles shouldn’t be configured like that.
/ip firewall mangle screenshot is attached

Also prioritization doesn’t work, since if I start my IPTV only, it works fine. Now, while IPTV is running, if I start a download, my IPTV is screwd. Image is distorted and become impossible to view and hear the audio.
/queue tree screenshot is attached

Any solutions?

Thanks,
T.P.
tree.jpg
mangle.jpg

Hi from your Web Mangle Mark up rule MAX packet size has to to be in the range of 0-65535. Any advice on what to set it as?
ROS6.2 RB1100AHx2

We need someone from MikroTik (or popular online blogger) to help with these rules. These are what I was able to create based on documentation. Qos is a very important feature and one of the main reasons someone would want one of these advanced routers. Let’s hope they chime in and we can build a good default script.

Hello everyone. I’ve tested and updated the script. It now works correctly on RouterOS 6.1. Note that ether1 is WAN and ether2 is LAN. Adjust those as necessary for your environment.

I would appreciate if someone could tell me how to mark big downloads over HTTP traffic. Currently, the script marks port 80 so everything HTTP gets too much priority. The idea situation would be to let short bursts of HTTP traffic get high priority and the big long downloads get less.

with connection byte ?

Thank you, the answer is to use connection-bytes and connection-rate.

I’ve watched these 2 videos: HR13: QoS on RouterOS v6 and MUM US11: QoS workshop. In the second video (18:15min) Janis says: “Prerouting is a sum of (mangle) input and (mangle) forward. Both chains are together in here. Postrouting is a sum of (mangle) forward and (mangle) output.”

Prerouting = input + forward
Postrouting = output + forward

In your Option 2 configuration You used prerouting and postrouting together. Will these two mangles come into conflict (because of 2 forwards)? If I’ve understood it correctly, in mangle postrouting we mark traffic that goes from the router (output) and through the router (forward). How will this affect the marked traffic from the prerouting and meant for forward? Will it be remarked?

I don’t think the 2011 talk was referring to v6, maybe it was. But Prerouting not = input + forward. Look at the 3rd image here. The reason I use pre and post on DNS traffic is because the forward chain is not able to mark traffic sourced from the router itself and also traffic coming into the router from LAN.

Maybe there are other ways of accomplishing the same thing. Perhaps your question will reveal a better way. At the moment, this is all I know. However, when I was watching traffic from the connections menu, doing what I’m doing now was the only way to see it show up marked.

I believe the presentation (Packet Flow and QoS v6) in the 1st video (from 7:16min) could help clarify the situation. This is for ROS v6.

All traffic from the Input Interface goes to Chain Prerouting. If we choose to mark it in Prerouting, from there on, all traffic going to Input and Forward is marked. So, in a way, Prerouting is a sum of Forward and Input.
The Chain Output will remain unmarked. Maybe this is the answer on how to mark traffic sourced from the router itself. Mark it in the mangle Chain Output?

Looking at OPTION 2 above…

In Queue A, you have voip = priority 1
In Queue B, you have ack = priority 1
In Queue C, you have http = priority 1

Since the parent queues don’t have a priority, what actually makes “queue A priority 1 (voip)” a higher priority than “queue C priority 1 (http)” since they are both priority 1?

Isn’t there a setting that must tell which parent has a higher priority than another parent, or how will it know?

Or, if priority is the wrong term, the real question is: What keeps queue C from using up all the bandwidth and not leaving any for queue A, since they are both maxed at 900k/4M?